nealalan.github.io/command
TOC:
- COMMANDS 101
- ACCOUNTS / SYS ADMINISTRATION,
- AUDIO / VIDEO
- AWS
- CONFIGURATIONS (systems)
- CTF / DEVSEC / PENTEST
- DEV TOOLS
- DOCKER
- ENCRYPTION
- FILES - zip, transfer
- FONTS
- GIT
- IMAGES & GRAPHICS
- MONITORING
- NETWORKING
- PACKAGE MANAGERS
- PM2
- POSTGRES
- SEARCHING
- TOOLS & SOFTWARE (aka other)
- WEB SERVER
- WORDPRESS
COMMANDS 101
FIRST Change the command line to something civil and meaningful. Regarding editing… I started using PICO editor in 1992 or 1993. It’s now deprecated to NANO editor - something REALLY FANCY is you can add -m to use the MOUSE!!!
# see what the prompt is set to, if nothing then we can add one... if something, you can search
#  how to set all sorts of things including flashing text.
$ cat ~/.bashrc | grep PS1
# edit...
$ nano ~/.bashrc
# Add this line....
This line found in this gist. I can’t put it in this document because Jekyll markdown freaks out!
Basic commands to navigate use the command line ECHO - write arguments to the standard output
$ echo "cat" > cat.txt
$ echo $PATH
$ echo $(date)
CAT - concatenate and print files
#  -n number the output lines starting a
#  -s squeeze out blank lines
#  -t -v display non-printable characters
$ cat cat.txt
$ cat cat.txt cat.txt > 2cats.txt
# On a linux distro besides Mac / Darwin, try
$ cat /etc/os-release
DATE = GENERATE A 16 CHAR RANDOM PASSWORD
$ date | md5 | tail -c16
# if pwgen installed
$ pwgen 16 -ncy
HEAD (display the first lines of a file) & TAIL (display the last part of a file)
# head [-n count | -c bytes] [file ...]
$ head -n1 file
# tail [-F | -f | -r] [-q] [-b number | -c number | -n number] [file ...]
# continue to print out an open file such as a log, while it is written to
$ tail -f /var/log/wifi.log
PS - process status AWK [ -F fs ] [ -v var=value ] [ ‘prog’ | -f progfile ] [ file … ]
$ ps aux
$ ps -u root
DISK USAGE
$ df -ah
# DISK USAGE by folder
$ du -sh
LOCATE
EXPORT
$ export PATH=$PATH:$HOME/.local/bin
JQ - Command Line JSON PARSER
$ echo '{"foo": 0}' | jq .
LINK, LN, See also: ln command
# LN - link
#  -s is a symbolic link
$ sudo ln -s /home/ubuntu/sites-available sites-available
$ sudo ln -s /var/www/nealalan.com/html/ nealalan.com

# On my MacBookPro I wanted a folder called ~/Projects/ to point to my ~/Google Drive/DEV folder
$ ln -s '/Users/neal/Google Drive/DEV/' Projects
# And my ~/Pictures/ to point to ~/Google Drive/PHOTOS/
$ ln -s '/Users/neal/Google Drive/PHOTOS/' Pictures
# And my ~/Desktop/Screenshots/ to point to ~/Google Drive/PHOTOS/Screenshots/
$ ln -s '/Users/neal/Google Drive/PHOTOS/Screenshots/' Screenshots
SED / STREAM EDITOR - Stream editing data, useful with Regex to change contents of a file from the command line
# Install GNU `sed`, overwriting the built-in `sed` on MacOS
$ brew install gnu-sed --with-default-names
$ sed -f <text-commands>
# deleted 1 and 3
$ seq 10 | sed -e 1d -e 3d
$ seq 10 | sed -e '1d;3d'
# replace sour char with dest char in order
$ sed y/source-chars/dest-chars/
# replaces all numbers in format of 999-99-9999 or 9 numbers in a row
$ sed "y/123/abc/"
$ sed -ri ':1
         s/(^|[^-0-9])[0-9]{3}-[0-9]{2}-[0-9]{4}([^-0-9]|$)/\1XXX-XX-XXXX\2/g
         s/(^|[^-0-9])[0-9]{9}([^-0-9]|$)/\1XXXXXXXXX\2/g
         t1' <ssn.txt>
TEE - add / append input to a file
$ echo dog | tee -a text.txt
$ echo cat | tee -a text.txt
$ curl https://raw.githubusercontent.com/hashicorp/vagrant/master/keys/vagrant.pub | tee -a text.txt

ACCOUNTS / SYS ADMINISTRATION
OS Version
$ ubuntu@nealalan:~$ uname -a
Linux nealalan 4.4.0-1060-#69-Ubuntu SMP Sun May 20 13:42:07 UTC 2018 x86_64 x86_64 x86_64 GNU/Linux
OS Release Version (centos)
$ cat /etc/centos-release
Change to root
$ sudo -u root bash
remote connections
$ ssh -i <pem> <user>@<ip>
$ scp -i <pem> <local> <dest>
users & accounts
$ adduser
$ addgroup
$ chown

# FILE ACCESS CONTROL LIST
$ getfacl <file>
$ setfacl -m u:user2:rwx example/
$ setfacl -m g:group1:rwx ./

# ADDING A NEW USER
$ sudo adduser neal
$ sudo su neal (either way)
$ cd /home/neal
$ sudo mkdir .ssh
$ sudo ssh-keygen
$ sudo usermod -aG sudo neal   // add to group sudo
$ sudo cat nealkey.pub > authorized_keys
$ sudo nano /etc/ssh/sshd_config
#     UsePAM yes
#     allowAllowUsers neal
CHGRP - Group Ownership
# CHGRP - change group ownership
# Change the group of /u and subfiles to "admin".
$ chgrp -hR admin /u
# Change the current folder, all subfolders and files to the group "nealalan.com"
$ chgrp -hR nealalan.com .
AUDIO / VIDEO
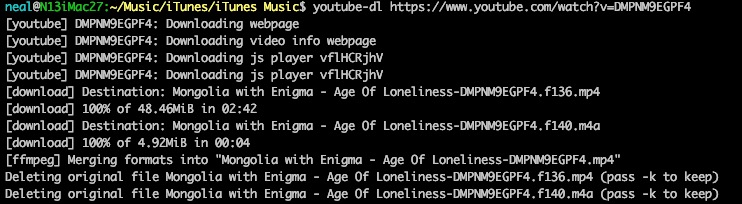
MP3 Audio and MP4 Video downloader
- I recommend not installing youtube-dl using pip… if you did use
pip uninstall youtube-dlto remove it
# INSTALL:
$ brew install youtube-dl

# USE:
# to download video file
$ youtube-dl <https://link>

# to download videos with the best combination of audio and video, use:
$ youtube-dl -f best <https://link>
- With the war between youtube and youtube-dl… I found Homebrew didn’t always install the latest. To install directly from youtube-dl (Note: this won’t use a package manager!!!)
$ sudo curl -L https://yt-dl.org/downloads/latest/youtube-dl -o /usr/local/bin/youtube-dl
$ sudo chmod a+rx /usr/local/bin/youtube-dl
# to download audio file as mp3 and 320K bitrate
$ youtube-dl --extract-audio --audio-format mp3 --audio-quality 320K <https://link>

Audio / Video player install
# Install MPV https://mpv.io/installation/
$ brew install mpv

Audio Player
# from the command line you can use the arrow keys to control the playback of the audio
$ mpv <file.mp3>

Video Player
# interact with the video player that is spawned from the command line
$ mpv <file.mp4>


Compress video - .mkv
I started with a 57 minute show that was 3814 meg and compressed to 280 meg in 12 minutes.
ffmpeg -n -i input.mkv -vcodec libx264 -crf 28 -preset faster -tune film output.mkv
AWS
AWS & LOCALSTACK
# INSTALL:
$ brew install aws-cli
$ pip install localstack
# USE:
# Using prowler for security checks and debugging
# - this command will search for all SGs in an account and output bash debug
$ bash -x ./prowler -c extra75 -m 200 > debug.log 2>&1
CONFIGURATIONS
MacOS / Darwin Specific
APPLE XCODE COMMAND LINE DEVELOPMENT
# INSTALL:
$ xcode-select --install
Show all files in Mac OS Finder and on desktop (Note this will show annoying OS files)
$ defaults write com.apple.finder AppleShowAllFiles NO && killall Finder
$ defaults write com.apple.finder AppleShowAllFiles YES && killall Finder
Hide everythign on the Desktop and stop files from being drug to it
$ defaults write com.apple.finder CreateDesktop -bool false && killall Finder
Set where screenshots from PNG to JPG and location they are saved to
$ defaults write com.apple.screencapture location ~/Desktop/Screenshots
$ defaults write com.apple.screencapture type jpg && killall SystemUIServer
Always show the ~/Library folder
$ chflags nohidden ~/Library/
Show the ~/.ssh folder as ~/ssh
$ ln -s ~/.ssh ~/ssh
Speed up TimeMachine Backups link
# only persists until a reboot
$ sudo sysctl debug.lowpri_throttle_enabled=0
# slow back down without a reboot
$ sudo sysctl debug.lowpri_throttle_enabled=1
Expand the Save Panel by default
$ defaults write NSGlobalDomain NSNavPanelExpandedStateForSaveMode -bool true
$ defaults write NSGlobalDomain NSNavPanelExpandedStateForSaveMode2 -bool true
# use false to turn this off
Force text edit to default to plain text vs RTF format
$ defaults write com.apple.TextEdit RichText -int 0
# Undo using:
$ defaults delete com.apple.TextEdit RichText
Add a blank icon to the dock, move it around and add another…
$ defaults write com.apple.dock persistent-apps -array-add '{tile-data={}; tile-type="spacer-tile";}' && killall Dock
Set the max size to a time machine backup to 250GB (useful when multiple machines backup to the same drive)
$ sudo defaults write /Library/Preferences/com.apple.TimeMachine MaxSize -integer 256000
# To reset to no limit
$ sudo defaults write /Library/Preferences/com.apple.TimeMachine MaxSize
Mojave Update Issues
I started seeing errors using homebrew after upgrading to macOS Mojave 10.14. It appears paths were removed.
$ brew upgrade
Resulted in:
xcrun: error: invalid active developer path (/Library/Developer/CommandLineTools), missing xcrun at: /Library/Developer/CommandLineTools/usr/bin/xcrun
To fix this [article]:
$ xcode-select --install
# RESULTS IN:
xcode-select: note: install requested for command line developer tools
LAUNCHCTL
I used launchctl to clean up all the automatically launched items on a clean install.
Usage: launchctl <subcommand> ...
Subcommands:
	bootstrap       Bootstraps a domain or a service into a domain.
	bootout         Tears down a domain or removes a service from a domain.
	enable          Enables an existing service.
	disable         Disables an existing service.
	uncache         Removes the specified service name from the service cache.
	kickstart       Forces an existing service to start.
	attach          Attach the system's debugger to a service.
	debug           Configures the next invocation of a service for debugging.
	kill            Sends a signal to the service instance.
	blame           Prints the reason a service is running.
	print           Prints a description of a domain or service.
	print-cache     Prints information about the service cache.
	print-disabled  Prints which services are disabled.
	plist           Prints a property list embedded in a binary (targets the Info.plist by default).
	procinfo        Prints port information about a process.
	hostinfo        Prints port information about the host.
	resolveport     Resolves a port name from a process to an endpoint in launchd.
	limit           Reads or modifies launchd's resource limits.
	runstats        Prints performance statistics for a service.
	examine         Runs the specified analysis tool against launchd in a non-reentrant manner.
	config          Modifies persistent configuration parameters for launchd domains.
	dumpstate       Dumps launchd state to stdout.
	reboot          Initiates a system reboot of the specified type.
	bootshell       Brings the system up from single-user mode with a console shell.
	load            Bootstraps a service or directory of services.
	unload          Unloads a service or directory of services.
	remove          Unloads the specified service name.
	list            Lists information about services.
	start           Starts the specified service.
	stop            Stops the specified service if it is running.
	setenv          Sets the specified environment variables for all services within the domain.
	unsetenv        Unsets the specified environment variables for all services within the domain.
	getenv          Gets the value of an environment variable from within launchd.
	bsexec          Execute a program in another process' bootstrap context.
	asuser          Execute a program in the bootstrap context of a given user.
	submit          Submit a basic job from the command line.
	managerpid      Prints the PID of the launchd controlling the session.
	manageruid      Prints the UID of the current launchd session.
	managername     Prints the name of the current launchd session.
	error           Prints a description of an error.
	variant         Prints the launchd variant.
	version         Prints the launchd version.
	help            Prints the usage for a given subcommand.
CTF / DEVSEC / PENTEST
# Install some CTF tools; see https://github.com/ctfs/write-ups.
brew install aircrack-ng
brew install bfg
brew install binutils
brew install binwalk
brew install cifer
brew install dex2jar
brew install dns2tcp
brew install fcrackzip
brew install foremost
brew install hashpump
brew install hydra
brew install john
brew install knock
brew install netpbm
brew install nmap
brew install pngcheck
brew install socat
brew install sqlmap
brew install tcpflow
brew install tcpreplay
brew install tcptrace
brew install ucspi-tcp # `tcpserver` etc.
brew install xpdf
brew install xz
Burp Suite
Not a command line tool, but here’s info:
- Burp Proxy allows manual testers to intercept all requests and responses between the browser and the target application, even when HTTPS is being used.
- You can view, edit or drop individual messages to manipulate the server-side or client-side components of the application.
- The target site map shows all of the content that has been discovered in sites being tested.
CURL - use to find internet IP address
$ curl http://169.254.169.254/
Also you can curl ifconfig.co and it will return your IPv4 or IPv6 IP address
$ curl -4 ifconfig.co
$ curl -6 ifconfig.co
Or for cool output, install “TOIlet”
# INSTALL LINUX:
$ sudo apt install -y toilet
# INSTALL MAC:
$ brew install toilet
# use
$ curl -s4 ifconfig.co | toilet -w 140 -f mono12

NETSTAT - show network status, network connections, routing tables, interface statistics, masquerade connections, and multicast memberships
#  -r show the routing tables
#  -s Show per-protocol statistics
#  -tu tcp & udp
$ netstat
$ netstat -a | more
# List active internet connections
$ netstat -plnt
SS
# SS
$ ss -l
$ ss -ntp
$ ss -tupl
NSLOOKUP - QUERY INTERNET NAME SERVERS INTERACTIVELY
# returns the domain name server the IP to domain resolution came from
# -type=SOA : find out the server of authority = might not work
$ nslookup neonaluminum.com
DIG - DOMAIN INFORMATION GATHERING
# primarily used for DNS queries of A, TXT, MX, SOA, NS record sets
$ dig neonaluminum.com
# trace trace the domain server of authority (SOA)
$ dig +trace neonaluminum.com
# pull the DNS records (use A, TXT, MX, SOA, NS, ANY)
$ dig neonaluminum.com ANY +noall +answer
# from google, expanded lines
$ dig @8.8.8.8 +nocmd neonaluminum.com any +multiline +noall +answer
WHOIS - QUERY IANA.ORG FOR DOMAIN INFO
$ whois neonaluminum.com
SHODAN
The search engine (API) for security.
# INSTALL (Mac):
$ easy_install shodan
$ shodan init YOUR_API_KEY

# Reverse lookup for an IP address
#   In browser: https://api.shodan.io/dns/reverse?ips=8.8.8.8&key={YOUR_API_KEY}
$ shodan host 8.8.8.8

# Search shodan
$ shodan search --fields ip_str,port,org,hostnames microsoft iis 6.0
DIRB
$ dirb 10.10.50.2
METASPLOIT
# metaspolit console
$ msfconsole
$4search shellshock
$ show options
# LOAD PARMS
$ set RHOST 10.10.50.2
$ set TARGETURI /cgi-bin/test-cgi
SOCIAL ENGINEERING
# Discovery
# Harvester
DEV TOOLS, CODE & SCRIPTING
SCRIPTING
# Don't forget:
$ chmod +x script.sh
maven
apache maven will build your jar files from java source packages.
# from your project-dir/pom.xml folder
$ mvn package
# you should end up with BUILD SUCCESSFUL and a folder project-dir/target/
NODE, NPM, N
n is a node version manager: https://github.com/tj/n
$ brew install node npm n
$ sudo n lts
Check them:
$ node -v
$ n
$ npm -v
TESTEM
$ npm install testem -g
LINTER
$ npm install -g eslint eslint-config-fullstack eslint-plugin-react babel-eslint
# ADD ESLint extension to VSCode
PYTHON
PACKAGE MANAGER FOR PYTHON
# INSTALL:
$ sudo easy_install pip
RUBY & JEKYLL
SQL
- sqlmap
DOCKER
First, download and start Docker GUI (Mac). Once started you can use $ docker from the terminal.
Pull and Launch CentOS to CLI
$ docker pull centos
$ docker run -it centos
If you try and run centos without a TTY, it will launch and quit.
ENCRYPTION
CHECKSUMS / MD5
# MD5 - calculate a message-digest fingerprint (checksum) for a file
# syntax: md5 [-pqrtx] [-s string] [file ...]
PGP
# Install GnuPG to enable PGP-signing commits.
$ brew install gnupg
# I ran into some conflicts and had to perform a
$ brew reinstall gnupg
$ gpg --version
$ gpg -K
Generate a Public key from a Private key
# extract the public key and store
openssl rsa -in mykey.pem -pubout > mykey.pub
FILES
# DIRECTORY/FILE COLLAPSE
# find all files in this directory and its sub-directories
# and execute mv with target directory . for each file found
# to move them to current directory.
# Note: I tried adding mv --backup=numbered but this doesn't work
#  so I added -n to keep from overwriting files with the same name
$ find . -mindepth 2 -type f -print -exec mv -n {} . \;
# ARCHIVE/ZIP
# -r recursively through dirs
# -dc a nice output
# -9 max compression (no reason not to if storing on the cloud?!)
# can use REGEX with it also :D
$ zip -r -dc -9 archive_name *
I use this to sync photos from the source to my iMac
# SYNC FILES ACROSS COMPUTERS
# --dry-run is obviously removed for the real xfer
$ rsync --dry-run --recursive --compress --progress --delete --itemize-changes ~/Pictures/ neal@192.168.1.42:/Users/Neal/Pictures/All_Photos > ~/Desktop/pic_bkp_$(date +"%Y%m%d_%H%M%S").txt
I use this to sync music to backups and other computers
# SYNCH FILES ACROSS COMPUTER, DISPLAY DELETED FILES ONLY
$ rsync -azP --delete -n ./ /Volumes/USB20FD/Music | grep 'deleting'
FONTS
# Install font tools.
brew tap bramstein/webfonttools
brew install sfnt2woff
brew install sfnt2woff-zopfli
brew install woff2
GIT
Regular daily use
$ git status
$ git pull
$ git push
$ git clone git@github.com:nealalan/command.git
a trick i found on stackoverflow when .git/index.lock gives Permission Denied
$ sudo chown -R : .git  # change group
$ sudo chmod -R 775 .git  # change permission
git setup
https://help.github.com/en/articles/connecting-to-github-with-ssh
1) Install on Ubuntu 18.04:
$ sudo apt install git git-gui git-doc
$ git version
# setup git
$ sudo git config --global --edit
2) Create Keypair
Tips:
- create the keypair using the @users.noreply.github.com found in Github: Settings: Emails.
- it’s smart to be in the ~/.ssh folder and name the keypair github_keypair
$ ssh-keygen -t rsa -b 4096 -C "neal@users.noreply.github.com"Check the ssh-agent is running and add the key identity
$ eval "$(ssh-agent -s)"
$ ssh-add -k ~/.ssh/id_rsa
3) Add the Keypair to GitHub SSH and GPG Keys
Print out the PRIVATE key to copy and paste into GitHub. I name it something like “Ubuntu 2019-12-31” to I know what it is and if it’s current.
cat ~/.ssh/id_rsa.pubVerify the keypair is added to github:
$ ssh -T git@github.comYou should see a message “Hi x! You’ve successfully authenticated, but GitHub does not provide shell access.
4) If you cloned a repo already, you need ot set it to the correct repo using SSH
$ git remote set-url origin git@github.com:nealalan/nealalan.com.git
5) If you only created a new repo on github
First time using a repo… or create a new repository on the command line:
# create a file and add the remote repo
echo "# nealalan.com" >> README.md
git init
git add README.md
git commit -m "first commit"
git remote add origin git@github.com:nealalan/nealalan.com.git
git push -u origin master
6) When you make changes to the repo
…or push an existing repository from the command line
git remote add origin git@github.com:nealalan/nealalan.com.git
git push -u origin master
NOTE: If you have problems with permission denied, it could have to do with the ownership of the local files. Set the ownership to:
$ sudo chown -R ubuntu:ubuntu /var/www/
hub
hub is a github utility that lets you create a repo remotely
- https://hub.github.com/
- to use it you’ll need to also install Go
These GitHub commands are provided by hub:

 browse         Open a GitHub page in the default browser
 ci-status      Show the status of GitHub checks for a commit
 compare        Open a compare page on GitHub
 create         Create this repository on GitHub and add GitHub as origin
 delete         Delete a repository on GitHub
 fork           Make a fork of a remote repository on GitHub and add as remote
 issue          List or create GitHub issues
 pr             List or checkout GitHub pull requests
 pull-request   Open a pull request on GitHub
 release        List or create GitHub releases
 sync           Fetch git objects from upstream and update branches
IMAGES & GRAPHICS
ExifTool
Here’s a list of all the EXIF meta-data tags And an exiftool cheatsheet by rjames86
# ExifTool - Read, Write and Edit Meta Info
# Info: https://www.sno.phy.queensu.ca/~phil/exiftool/
# [Installing](https://www.sno.phy.queensu.ca/~phil/exiftool/install.html) exiftool:
$ brew install exiftool
# To show all metadata stored on a file AND THE FILE INFO (some info comes from the OS)
$ exiftool photo.jpg
$ exiftool photo.jpg | grep -E 'File Name|Create Date'
Manually manipulate metadata fields
# Quick and dirty way for a while directory
$ exiftool "-AllDates=1986:11:05 12:00:00" -if '$filetype eq "JPEG"' .
# Field at a time
$ exiftool '-datetimeoriginal=2015:01:18 12:00:00' .
A useful command to rename all your files based on the date. See advanced features also.
# this will rename Ex: IMG_0001.JPG to 20180704_113201.JPG
#  Note: filtering out PNG and MP4 files.
$ exiftool "-testname<CreateDate" -d %Y%m%d_%H%M%S-%%f.%%e ./*.JPG
$ exiftool "-FileName<CreateDate" -d %Y%m%d_%H%M%S-%%f.%%e ./*.JPG
# this will rename Ex:
$ exiftool '-testname<%f-$imagesize.%e' ./*.JPG
$ exiftool '-FileName<%f-$imagesize.%e' ./*.JPG
Note: to rename a file using the date for an iOS PNG that doesn’t stote the CreateDate, we can use the -FileCreateDate. It is possible to use an exiftool command to update the exif CreateDate using the FileCreateDate info, but I’m choosing not to do that since the scope for me is just to rename the files.
$ exiftool "-testname<FileCreateDate" -d %Y%m%d_%H%M%S-%%f.%%e ./*.PNG
$ exiftool "-FileName<FileCreateDate" -d %Y%m%d_%H%M%S-%%f.%%e ./*.PNG
$ exiftool '-testname<%f-$imagesize.%e' ./*.PNG
$ exiftool '-FileName<%f-$imagesize.%e' ./*.PNG
Moving files
# move from DIR into folders by image date
$ exiftool "-Directory<DateTimeOriginal" -d "%Y/%m/%d" ./
Incase you do want to update PNG metadata CreateDate you can do it like this

Imagemagic
My first need was to convert all PNG files to JPG. The iPhone creates PNGs out of screenshots and they take up too much room!!!
# INSTALL
$ brew install imagemagick
$ convert
$ mogrify
# To see output and compress
$ for i in *.PNG; do mogrify -resize 75% -format jpg "$i"; echo "$i converted to ${i%.*}.jpg"; done
# To see output and compress and remove the PNG files
$ for i in *.PNG; do mogrify -resize 75% -format jpg "$i" && rm "$i"; echo "$i converted to ${i%.*}.jpg"; done
Install the ghostscript package will allow for converting PDF’s to JPG’s
$ brew install ghostscript
MONITORING
# SHOW STATUS OF WHAT'S CURRENTLY RUNNING
# service <servicename> status
$ service --status-all
SYSTEM IO MONITORING LOOP
# writes out the activity  on the system every 3 seconts
$ while true ; do iostat -w 3 ; done
TOP – display and update sorted information about processes
$ top -o cpu -O +rsize -s 3
IFTOP – Interface top in a refreshing screen with cum view
$ sudo iftop -i en0
SYSTEMCTL & JOURNALCTL
$ systemctl start
$ systemctl stop
$ systemctl status <servicename>
# journalctl - Log file for the system to help debug when a server doesn’t start
$ journalctl -xe
- note-to-self: need to check out mytop, mtop, innotop, mysqladmin
MySQL / MariaDB
- mysql - command line client
- mysqlshow — Display Database, Table, and Column Information
- mysqladmin - Client for Administering a MySQL Server
- mysqlcheck — A Table Maintenance Program (checks, repairs, optimizes, or analyzes tables.)
-
$ mysql -u root -p
> exit;
> select version();
> show databases;
> use mysql
> show tables;
Backup and Recovery
- mysqldump - A Database Backup Program
- dumps one or more MySQL databases for backup or transfer to another SQL server
- generate output in CSV, other delimited text, or XML format
- mysqlpump — A Database Backup Program
- performs logical backups, producing a set of SQL statements that can be executed to reproduce the original database object definitions and table data.
- dumps one or more MySQL databases for backup or transfer to another SQL server
- mysqlimport — A Data Import Program
- command-line interface to the LOAD DATA INFILE SQL statement
So I forgot my password to access MySQL. To reset it:
# Stop the MySQL Server:
$ sudo /etc/init.d/mysql stop
# Start the mysqld configuration:
$ sudo mysqld --skip-grant-tables &
# Login to MySQL as root:
$ mysql -u root mysql
# Replace YOURNEWPASSWORD with your new password:
> UPDATE
  mysql.user
SET
  Password = PASSWORD('YOURNEWPASSWORD')
WHERE
  User = 'root';
FLUSH PRIVILEGES;
exit;
NETWORKING
NETWORK MONITORING
# INSTALL:
$ brew install iftop
SPEEDTEST
# DARWIN:
$ brew install speedtest-cli
# UBUNTU:
$ apt install speedtest-cli

IFCONFIG - network interface configuration & routing for the computer ports
$ ifconfig en0
$ ifconfig | grep 'inet'
nc / netcat
TCP & UDP connections and listener
# NC - PULL A WEBPAGE
$ nc localhost 80
# NC - PORT SCANNING
$ nc -v -w 1 server2.example.com -z 1-1000
# NC - LISTEN FOR A CONNECTION ON PORT 42
#  -v add verbosity
$ nc -v -l 42
# CONNECT TO PORT 42 VIA THE LOOPBACK IP FROM ANOTHER TERM
$ nc -v 127.0.0.1 42
# either side can type and it will echo back
# terminate the connection with ^D (EOF)
# NC - SEND FILES
$ nc -lp 1234 > stuff_to_send.txt
$ nc -w 1 server 1234 < stuff.txt

# LISTEN INTO A FILE
$ nc -v -l 43 > filename.receive
# SEND A FILE TO PORT 43 VIA THE LOOPBACK IP FROM ANOTHER TERM
$ nc -v 127.0.0.1 43 < filename.send
nethogs
# NETHOGS -- monitor process socket connections
nmap
nmap can be super noisy and really irritate anyone you run it against recommend you only run it again computers within your internal network or scanme.nmap.org
# FIND OUT WHAT'S THERE BRUTELY, RECURSIVELY
# this will give you a nice idea of how to hit a server that's poorly configured and open
# -A : enable OS detection and version detection, script scanning and tracert
# -T4 : faster execution (about 1 min for me usually)
# -r : scan ports consecutively
# -p : port range
$ nmap -A -T4 -r -p [1-9999] <address>
#
$ nmap -sC

$ nmap localhost
$ scutil --proxy
$ scutil --dns
$ scutil --get ComputerName
PACKAGE MANAGERS
BREW (HOMEBREW) PACKAGE MANAGER
# INSTALL:
$ ruby -e "$(curl -fsSL https://raw.githubusercontent.com/Homebrew/install/master/install)"
# CHECK STATUS:
$ brew doctor
OTHER BREW COMMANDS
# SEE WHAT'S INSTALLED:
$ brew list && brew cask list
$ system_profiler -detailLevel full SPApplicationsDataType >> installed_software_$(date "+%Y%m%d_%H%M%S").txt
$ brew ls --full-name --versions >>  installed_software_$(date +"%Y%m%d_%H%M%S").txt

# CREATE 'Brewfile' LIST OF INSTALLS & INSTALL LIST IN 'Brewfile'
$ brew bundle dump
$ brew Brewfile

# SEARCHING FOR INSTALLABLE PACKAGES
$ brew search

# REMOVE OUTDATES VERSIONS (from the cellar):
brew cleanup

# CHECK FOR UPDATES:
$ brew update
$ brew upgrade
APT PACKAGE MANAGER - native in Ubuntu
# APT / APT-GET -provides a high-level command line interface for the package management system
#  -y default yes
#  update = d/l package info from all configured sources
#  upgrade = install avai upgrades of all packages
# USE:
$ apt update
$ apt upgrade
$ apt install <package>
$ apt list --installed
# apt-cache - queries apt data
#  currently installed on the system from the sources configured via sources.list
$ apt-cache search <package>
$ apt-cache

# NOTE: You can install this on a Mac, but I choose not to at this point.

# CREATE A LIST OF INSTALLED PACKAGES
$ sudo apt list --installed >> installed_software_$(date +"%Y%m%d_%H%M%S").txt
PM2 - Advanced, production process manager for Node.js (wikipedia) (git)
PM2 is a production process manager for Node.js applications with a built-in load balancer. It allows you to keep applications alive forever, to reload them without downtime and to facilitate common system admin tasks.
Start, Stop, Restart an Application
$ pm2 start app_name_or_id
$ pm2 stop app_name_or_id
$ pm2 restart app_name_or_id
- PM2 will automatically assign an app name of the prefix
Status of PM2 Processes
$ pm2 list
$ pm2 info app_name_or_id
For a realtime monitor of processes:
$ app_name_or_id
Add PM2 as a Process
$ pm2 startup systemd
$ sudo env PATH=$PATH:/usr/bin /usr/lib/node_modules/pm2/bin/pm2 startup systemd -u ubuntu --hp /home/ubuntu
$ systemctl status pm2-ubuntu
POSTGRES
Switching Over to the postgres Account
Switch over to the postgres account and access a Postgres prompt immediately by typing:
$ sudo -i -u postgres
$ psql
Exit out of the PostgreSQL prompt by typing: \q
SEARCHING
particularly useful when searching for a file or searching for content in a file, such as something suspecious in a log file
# SEARCH A FILE FOR SPECIFIC CONTENT
# -H : print the filename of each match
# --max-count=#
# -c : suppress output and count matching lines
# -v : inverse matching
# -E : regex pattern search (or text search)
$ cat access.log | grep -E 'php|POST|HEAD|DNS'

# LSOF -- list open files
# huge man file and particularly useful, note security issues with it
$ lsof > ~/open_files.txt
TOOLS & SOFTWARE
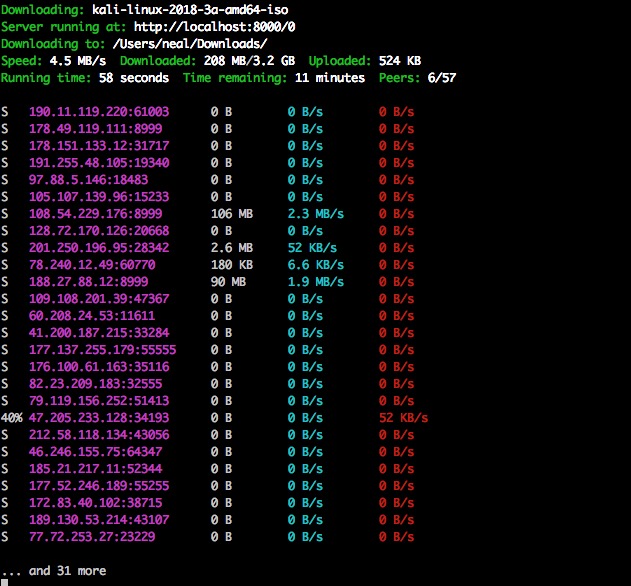
WEBTORRENT
# DARWIN:
$ brew install webtorrent-cli
# UBUNTU:
$ apt install webtorrent-cli
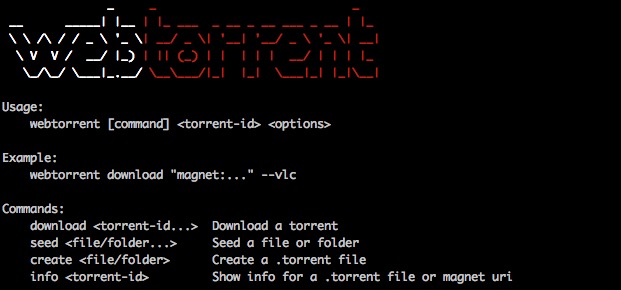
# USE:
$ webtorrent download https://images.offensive-security.com/kali-linux-2018.3a-amd64.iso.torrent -o ~/Downloads/
COREUTILS, MOREUTILS, FILEUTILS
# [GNU CoreUtils](https://www.gnu.org/software/coreutils/coreutils.html) - Basic file, shell and text manipulation utilities of the GNU operating system. These are the core utilities which are expected to exist on every operating system.
$ brew install coreutils
$ info coreutils

# [moreUtils](https://joeyh.name/code/moreutils/) - some other useful utilities like `sponge`
$ brew install moreutils
$ info sponge

# GNU fileUtils - some utils like `find`, `locate`, `updatedb`, and `xargs`, `g`-prefixed.
$ brew install findutils
$ info find

# Install Bash 4.
# Note: don’t forget to add `/usr/local/bin/bash` to `/etc/shells` before running `chsh`.
$ brew install bash
$ sudo nano /etc/shells
   # add `/usr/local/bin/bash` to `/etc/shells`

# Install bash-completion
$ brew install bash-completion2
$ sudo nano ~/.bash_profile
   # add the following to your ~/.bash_profile:
  if [ -f /usr/local/share/bash-completion/bash_completion ]; then
    . /usr/local/share/bash-completion/bash_completion
  fi
$ bash --version

# Updated from BSD grep 2.5.1 to GNU grep 3.1
$ brew install grep --with-default-names
EDITORS
# VI - I hate 'VIM' and will always just install NANO (command line) or ATOM (GUI)
$ brew install vim --with-override-system-vi
$ brew install nano
SCREEN - MULTITASKING TOOL
A tool that allows you to have multiple screens within a single session using “regions”
# INSTALL:
$ brew install screen
# Note: when I upgraded I went from v4.00.03 23-Oct-06 to v4.06.02 23-Oct-17
# USE:
#   you can see what's open using the `w` command
#   see key-bindings ^a-?
#   see all screens: ^a-*
#   new screen: ^a-c
#   jump between: ^a-" and scroll to select
#   spilt screen: ^a-S
DOWNLOADING UTIL
# INSTALL:
$ brew install wget --with-iri
# USE:
$ wget -P ~/Downloads/ https://download.virtualbox.org/virtualbox/5.2.18/VirtualBox-5.2.18-124319-OSX.dmg

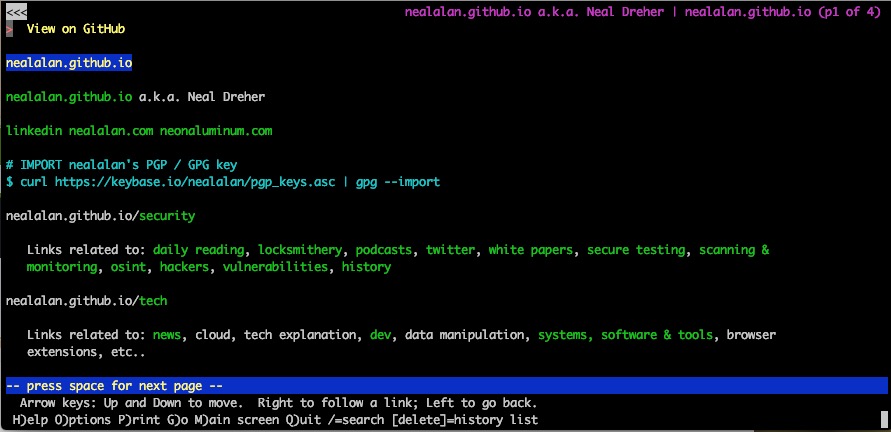
Text Based Web Browser - This is what I started using in 1994 on Freenets when I started writing HTML
# INSTALL:
$ brew install lynx
# USE:
$ lynx nealalan.github.io
….. Other things I haven’t documented yet
brew install openssh
brew install homebrew/php/php56 --with-gmp

# Install other useful binaries.
brew install ack
#brew install exiv2
brew install git-lfs
brew install imagemagick --with-webp
brew install lua

brew install p7zip
brew install pigz
brew install pv
brew install rename
brew install rlwrap
brew install ssh-copy-id
brew install tree
brew install vbindiff
brew install zopfli
Web Servers
CertBot
See what certs we have and expiry:
$ sudo certbot certificates
To update email with certbot:
$ sudo certbot update_account --update-registration --email thenew@email.address
Updating with wildcards proved to be a challenge. I ended up having many certificates and NGINX confused the certs in the config file because domain.com and *.domain.com had different cert. I cleaned them and ended up needing to add a new TXT DNS record called “_acme-challenge.neonaluminum.com” to verify I owned the domain.
$ sudo certbot --server https://acme-v02.api.letsencrypt.org/directory -d neonaluminum.com,*.neonaluminum.com,*.fire.neonaluminum.com --manual --preferred-challenges dns-01 certonly
NGINX
View status
$ sudo service status nginx
$ sudo systemctl status nginx
$ sudo systemctl status nginx.service
$ sudo journalctl -xe
# error messages... testing (or testing with a specific config file
$ nginx -t
$ nginx -c /etc/nginx/nginx.conf -t
Viewing the logs
$ sudo tail -f /var/log/nginx/error.log
Reload nginx server after you made changes to the config file such as nginx.conf:
$ sudo nginx -s reload
$ sudo systemctl reload nginx
$ sudo service nginx reload
Stopping and starting… some options
$ sudo systemctl start nginx
$ sudo systemctl stop nginx
$ sudo systemctl restart nginx
$ sudo service nginx start
$ sudo service nginx stop
$ sudo service nginx restart
$ sudo /etc/init.d/nginx start
$ sudo /etc/init.d/nginx stop
$ sudo /etc/init.d/nginx restart
More Useful CLI tools
- xmodulo.com/useful-cli-tools-linux-system-admins.html
WORDPRESS
- wordpress-online-vulnerabilitty-scanners
[edit]