nealalan.github.io/EC2_Ubuntu_LEMP
Project goals
- Create and install a free, sustainable webserver, running in the cloud.
- Configure the server to be secure, using https (SSL/TLS)
- Flexibility and scalibility to allow multiple domains to be hosted
- Leverage static IP addresses (free in AWS free tier)
- Consider as much automation as possible (using the command line or scripts remotely, instead of logging into the AWS console)
- Principle of least privilege using AWS IAM security controls.
Terminology
- LEMP server : Software and packages installed including: Linux, Nginx, MySQL, PHP (LEMP stack)
- AWS EC2 : Essentially a server running in the cloud, that you have total control over. you create it, start it, configure it and kill it as you please. And you pay for it if you use too much.
- AMI : Amazon Machine Image is an image of an operating system that is loaded when you create an AWS EC2 instance. Many of these are free.
- Ubuntu Linux : open source desktop, laptop and server grade operating system.
- Other Linux / AWS Linux AMI choices : Ubuntu is so widely used and supported - it’s the choice of most. I stick with it for reasons you can also read here, What type of AMI should you use?
- SSL/TLS/Secure Site : Assuming you use a new, commonly used browser, when you see https:// and a little padlock that is locked next to the address, you are being indicated the site is a secure site. If you are doing anything other than reading a site, it should have these. Never enter any data into an http:// site (without the “s”) because this is not secure. The information is sent over the internet as text. If it’s your password or a credit card number, it’s being exposed. (Note: SSL should no longer be used over the internet. TLS is its replacement.)
Lets get started…
What I won’t go over:
- You will need to have the ability to use the command line. If you’re on a windows machine and want some practice, you might try doing it from your web browser from Google Cloud Console for free.
- You will want to have an understanding of getting around the folder structure.
- PASSWORD MANAGER!!!! If you’re not using a password manager, you might not be ready for cloud technology. Here’s a good article on Consumer Reports: Everything You Need to Know About Password Managers
- I use LastPass and have been for years. I think it’s the best and it lets you put in all sorts of things, including scanned vehicle titles as a photo or scan.
AWS account

- If you have a .edu email address you can sign up for an educational account, which will not require a credit card. This will limit your account abilities, since you won’t be able to use features that would normally cost.
- To sign up for a free tier, you will have to enter a credit card. Be prepared to be charged a few dollars if you don’t pay attention to the terms. If you run more than 750 hours of EC2 instances in a month (there are 744 in a month) you can be charged. If you use more than 30 GB of space, irrelevant of the instance running, you will be charged.
- Pay attention to BILLING and cost explorer. They will show you what is going to potentially run you charges. Don’t panic. Once you remove it, the charges may go away.
Identity and Access Management (IAM) & Account Security
- When you have your account created, you’re going to come out with a number of pieces of data. Stored these in your password manager! This is for your root account. It is recommended you setup Multi-factor Authentication for your root account.
- AWS Console address: https://
.signin.aws.amazon.com/console - Username & Password
- Account ID
- Access Key ID
- Secret Access Key
- AWS Console address: https://

- IAM Dashboard will give you security status recomendations.
- The important recommendation is to create a new Administrator user that will actually be you. You shouldn’t be doing everything as root.
Pick Your Domain Name
- Domain names registered with GoDaddy or other registrar services.
- Easy to do.
- Can save you a few dollars. If you search “setup godaddy point to aws” you will find instructions.
- You have to setup the nameserver (NS) records on the registrar site to point to Amazon.
- For AWS Route 53, Go to “Registered domains” and click “Register domain”
Create a Hosted Zone in Route 53
- Go to “Hosted Zones” and click “Create Hosted Zone”
- Enter your domain name: neonaluminum.com
- Click Create!

- You now have your Start of Authority (SOA) and NameServer (NS) records. The NS records will be entered under the domain as the name servers to look for the DNS records.
XXXXX Strike this section because an Elastic IP works better - IAM Access for DNS Record Updates
- In the future we will need to update our DNS records for the domain name.
- Using a dynamic IP addresses costs extra money,
- Using a static IP address and updating a DNS record is free.
- You will need the “Hosted Zone ID” from Route 53 for this step.

- We want to use IAM to create a “system account” and give “programatic access” to only a few fuctions.
- Create a new IAM Policy under Policies: Create Policy
- Enter a name such as “AmazonRoute53UpdateDNS” and a Description.
- In the JSON tab, copy in the following code:
{
  "Version": "2012-10-17",
  "Statement": [
  {
      "Effect": "Allow",
      "Action": [
          "route53:ChangeResourceRecordSets",
          "route53:GetHostedZone",
          "route53:ListResourceRecordSets"
      ],
      "Resource": [
          "arn:aws:route53:::hostedzone/<hosted-zone-id>"
      ]
  },
  {
      "Action": [
          "route53:ListHostedZones",
          "route53:GetChange"
      ],
      "Effect": "Allow",
      "Resource": [
          "*"
      ]
  }
  ]
}
- Create a New Group called “UpdateRoute53”
- Attach Policies “AmazonEC2ReadOnlyAccess” the new one you created “AmazonRoute53UpdateDNS”
- Create a New User called “domain-name_update_dns” and check “Programatic Access”
- Add user to group “UpdateRoute53”
- Click Create User
- IMPORTANT! You will not be given an Access Key ID and Secret Access Key. You can NOT retrieve these later. I recommend you click download .csv file and you copy and paste these into a new entry in your password manager.

Virtual Private Cloud (VPC)
- A VPC is an isolated portion of the AWS cloud populated by AWS objects, such as Amazon EC2 instances.
- You can read here about using AWS best practices
- Some things will need to be created in order to launch our instance:
- VPC : I recommend using the Start VPC Wizzard, this will create a lot of what you need!
- The VPC CIDR Address is somewhat important. Read my next section.
- Route Table,
- Internet Gateway,
- Network ACL,
- Security Group,
- Public Subnet,
- Network Interface
- VPC : I recommend using the Start VPC Wizzard, this will create a lot of what you need!
- This is a lot to digest, but it’s important to understand what is being created and how everything relates.
VPC CIDR Address
- The IP addresses used within your cloud is part of a dedicated range of IP addresses. Whenever you connect to a WIFI connection, you’ll likely have an IP address that begins with 192.168 or 172. These are ranges in private network ranges.
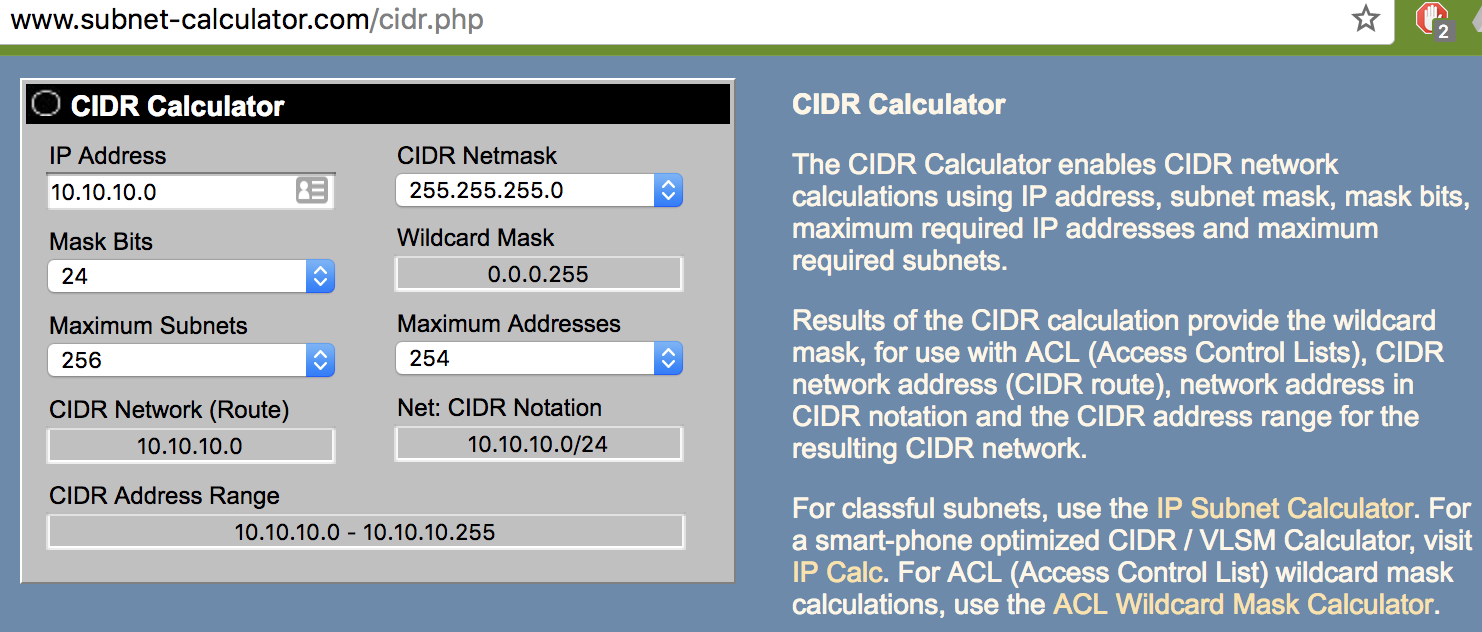
- Creating a Cloud we will create an IPv4 CIDR block 10.10.10.0/24 will give us address space for a standard small network.
VPC: Public Subnetwork (Subnet)
- Since the VPC is actually “virtual” we need to create an actual network (even though it’s also virtual since it’s in the cloud) to place our actual servers (that are also virtual).
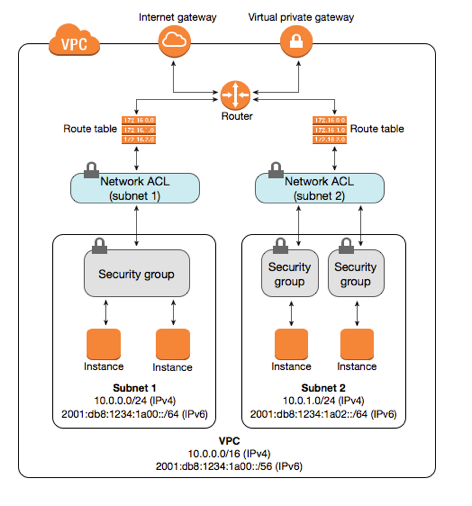
- A subnet can take up the entire address space of the VPC or you can make many subnets within a VPC to allow for private networks and a higher level of security.
- Since my VPC CIDR block is 10.10.10.0/24, I will create create a smaller subnet in the CIDR block of the VPC, set to 10.10.10.0/27.
VPC: Security: Network Access Control Lists (ACLs)
- See VPC ACLs documentation for full explanation. Here’s Amazons brief explanation:
- A network access control list (ACL) is an optional layer of security for your VPC that acts as a firewall for controlling traffic in and out of one or more subnets. You might set up network ACLs with rules similar to your security groups in order to add an additional layer of security to your VPC. For more information about the differences between security groups and network ACLs, see Comparison of Security Groups and Network ACLs.
- There are many different ways to configure security for your instance - Network ACLs, Security Groups, IPTables within the instance, making a subnet private - as you can see in this diagram:
EC2: Network & Security: Key Pairs
- This Key Pair is not the same as the key that was created when you created the AWS account!
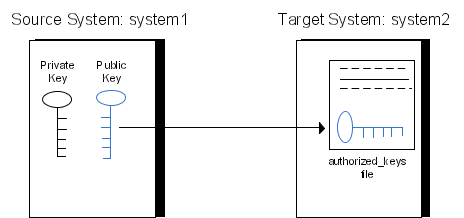
- Now, lets create one! (If you have one already, you can upload it also.)
- This key file that will be used to connect to your EC2 instances via SSH.
- Name it something more specific than “key”.
- Creating the key now, will have you automatically download it.
- You can assign this key to an instance later.
- Note: If you wait and let the key creation happen at the time you create an EC2 instance, you may run into frustrations.
- Note Conclusion: It’s just easier to create the key pair now and download your .pem file.
- Store your .pem file in your home/ folder or ~/.ssh/ folder
LAUNCH INSTANCE!
- Please don’t jump through this. Go through each screen by clicking “Next” and not “Lanuch”
- From the EC2 Dashboard, “Launch Instance”

- Step 1: Choose an Amazon Machine Image (AMI)
- You’ll want to scroll down to “Ubuntu Server” and make sure it says “Free tier eligible”
- Select
- Step 2: Choose an Instance Type
- “Free tier eligible”
- “Next: Configure Instance Details”
- Step 3: Configure Instance Details
- Purchasing Option: You’re in the free tier, no need to check this.
- Network: Select the VPC you created
- Subnet: Select the Subnet you created
- Auto-assign Public IP: This should be Enabled by Subnet default
- Likely don’t change anything else unless you want charges.
- Network interfaces: Allow a new network interface to be created for the subnet
- Next: Add Storage
- Step 4: Add Storage
- Next: Add Tags
- Step 5: Add Tags
- Add Tag, Key = “Name”, Value = “Neals Web Server”
- Next: Configure Security Group
- Step 6: Configure Security Group
- Security Group Name: “Neals Public Subnet SG”
- Since we created rules in the ACL earlier, those should limit traffic.
- One Rule: Type = All Traffic, Source = Custom 0.0.0.0/0
- Review and Launch
- Step 7: Review Instance Launch
- Launch
- Select “Choose an existing key pair” and select the key pair you created earlier.
- It’ll take a few minutes for the server to get up and running. You now have an Ubuntu server running in a Virtual Private Cloud, within a Public Subnet controlled by an ACL that only lets in SSH and HTTPS traffic.

- Go back to EC2 Instance dashboard and select your running instance, you can see your IPv4 Public IP address. This is what you can use to connect to your server.
- Click on “Actions: Instant State” for the options to Start and Stop your instances.
CONNECT TO YOUR INSTANCE
- Command line:
$ ssh -i ~/.ssh/neals_web_server.pem ubuntu@<ip-address>
- Amazon also has a way to connect via the web browser through a Java plugin.
# The first thing you want to do is ensure you're upgraded
# The second is install NGINX webserver
ubuntu@ip-10-10-10-13:~$ sudo apt -y update; sudo apt -y upgrade; sudo apt install -y nginx
- Change the host name
# OVERWRITE WHAT'S HERE WITH YOUR DOMAIN NAME
# for this change to show, it'll take a reboot
$ sudo nano /etc/hostname
Install Certbot
- Install Certbot on your instance
$ sudo add-apt-repository ppa:certbot/certbot
$ sudo apt -y update; sudo apt -y upgrade
$ sudo apt -y install python-certbot-nginx
Configure NGINX webserver
# MAKE THE HTML FOLDER FOR THE SERVERS
$ sudo mkdir -p /var/www/nealalan.com/html
$ sudo mkdir -p /var/www/neonaluminum.com/html
# CREATE LINKS IN THE HOME FOLDER TO THE WEBSITES
$ ln -s /var/www/nealalan.com /home/ubuntu/nealalan.com
$ ln -s /var/www/neonaluminum.com /home/ubuntu/neonaluminum.com
# CHANGE OWNERSHIP OF THE WEBSITE HTML FOLDERS
$ sudo chown -R $USER:$USER /var/www/nealalan.com/html
$ sudo chown -R $USER:$USER /var/www/neonaluminum.com/html
# CREATE GENERIC HTML PAGES
$ echo "nealalan.com" > ~/nealalan.com/html/index.html
$ echo "neonaluminum.com" > ~/neonaluminum.com/html/index.html
# CREATE LINE TO SITES-AVAILABLE NGINX CONFIG FILES
$ ln -s /etc/nginx/sites-available /home/ubuntu/sites-available
$ ln -s /etc/nginx/sites-enabled /home/ubuntu/sites-enabled
# CREATE NGINX CONFIG FILES
$ cd sites-available
$ sudo nano nealalan.com
- This will be our starting point. Update for your domain name(s) creating one for each. You can find a copy of this on github at nealalan/EC2_Ubuntu_LEMP/nginx.servers.conf.txt
server {
	listen 80;
	listen [::]:80;
	server_name nealalan.com www.nealalan.com;
	# configure a new HTTP (80) server block to redirect all http requests to your webserver to https
	return 301 https://nealalan.com$request_uri;
}
server {
	listen 443 ssl; # managed by Certbot
	server_name nealalan.com www.nealalan.com;
	# Where are the root key and root certificate located?

	#
	# Secure cipher suites and TLS protocols only within the 443 SSL server block?
	# ssl_protocols TLSv1 TLSv1.1 TLSv1.2;
	# ssl_ciphers "EECDH+AESGCM:EDH+AESGCM:ECDHE-RSA-AES128-GCM-SHA256:AES256+EECDH:DHE-RSA-AES128-GCM-SHA256:AES256+EDH:ECDHE-RSA-AES256-GCM-SHA384:DHE-RSA-AES256-GCM-SHA384:ECDHE-RSA-AES256-SHA384:ECDHE-RSA-AES128-SHA256:ECDHE-RSA-AES256-SHA:ECDHE-RSA-AES128-SHA:DHE-RSA-AES256-SHA256:DHE-RSA-AES128-SHA256:DHE-RSA-AES256-SHA:DHE-RSA-AES128-SHA:ECDHE-RSA-DES-CBC3-SHA:EDH-RSA-DES-CBC3-SHA:AES256-GCM-SHA384:AES128-GCM-SHA256:AES256-SHA256:AES128-SHA256:AES256-SHA:AES128-SHA:DES-CBC3-SHA:HIGH:!aNULL:!eNULL:!EXPORT:!DES:!MD5:!PSK:!RC4";
	#
	#  HTTP Strict Transport Security (HSTS) within the 443 SSL server block.
	add_header Strict-Transport-Security "max-age=31536000; includeSubDomains" always;
	#
	# Server_tokens off
	server_tokens off;
	#
	# Disable content-type sniffing on some browsers
	add_header X-Content-Type-Options nosniff;
	#
	# Set the X-Frame-Options header to same origin
	add_header X-Frame-Options SAMEORIGIN;
	#
	# enable cross-site scripting filter built in, See: https://www.owasp.org/index.php/List_of_useful_HTTP_headers
	add_header X-XSS-Protection "1; mode=block";
	#
	# disable sites with potentially harmful code, See: https://content-security-policy.com/
	add_header Content-Security-Policy "default-src 'self'; script-src 'self' ajax.googleapis.com; object-src 'self';";
	#
	# referrer policy
	add_header Referrer-Policy "no-referrer-when-downgrade";
	#
	# certificate transparency, See: https://thecustomizewindows.com/2017/04/new-security-header-expect-ct-header-nginx-directive/
	add_header Expect-CT max-age=3600;
	# HTML folder
	root /var/www/nealalan.com/html;
	index index.html;
}
- Now we need to enable our server blocks and restart / start NGINX
# CREATE LINKS FROM SITES-AVAILABLE TO SITES-ENABLED
$ sudo ln -s /etc/nginx/sites-available/nealalan.com /etc/nginx/sites-enabled/
$ sudo ln -s /etc/nginx/sites-available/neonaluminum.com /etc/nginx/sites-enabled/
# VERIFY NGINX CONFIGURATION
$ look for feedback to match the screenshot
$ sudo nginx -t
$ sudo systemctl restart nginx

Update you DNS A Record
- You will need the IP address of your server. You can look in the EC2 Dashboard or simply use
$ curl ifconfig.co
- Go to Route 53, select your hosted zone and create a new record set of Type A and value of your server IP address.
- Once the DNS update has cascaded out, you should be able to see the IP address assigned to the domain name.

Run CertBot!
- Many docs will say to use a different method. At the time I wrote this, a security incident had just happened with certbot, so I had to use this method.
$ sudo certbot --authenticator standalone --installer nginx -d nealalan.com -d www.nealalan.com --pre-hook 'sudo service nginx stop' --post-hook 'sudo service nginx start'
- If you look in your ~/sites-available/nealalan.com file, you should now see lines showing the ssl keys
- It’s a good idea to test out the automatic renewal of yout certificates using Certbot
$ sudo certbot renew --dry-run
- Now for the next web server
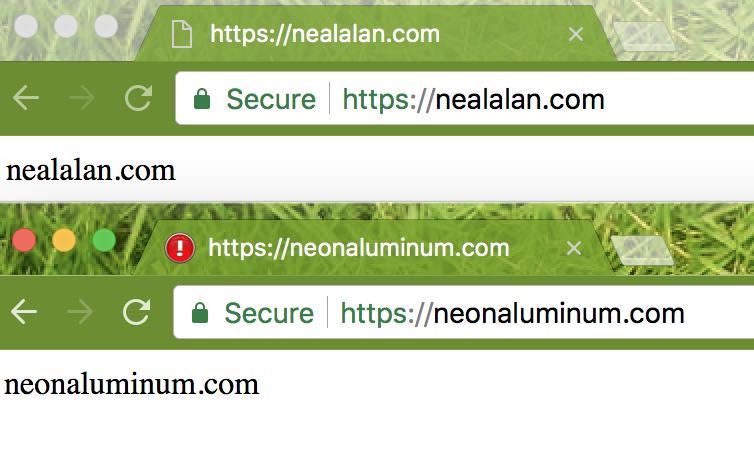
# Note: This didn't work for me because the stop didn't work. I ended up using a $ ps aux # to get the PID of nginx and then I ran $ sudo kill <PID> # to get nginx to stop. Then the certbot ran fun $ sudo certbot --authenticator standalone --installer nginx -d neonaluminum.com --pre-hook 'sudo service nginx stop' --post-hook 'sudo service nginx start' - Amazingly, I can now browse to both https://nealalan.com and https://neonaluminum.com and the test sites come up!
$ sudo reboot now
Install Git & Pull Down A Website
- I store my source code for websites here on github. To interact with GitHub we need to install a couple of utilities.
# Install JavaScript platform Note Package Manager $ sudo apt install npm # Install GITHUB API $ sudo npm install github-api # Configure $ git config --global user.email "neal@email" $ git config --global user.neal "nealalan" # Create an SSH key and display it $ ssh-keygen -t rsa -C "neal@nemail" $ cat ~/.ssh/id_rsa.pub - You must now give Github a copy of your public key so it will be able to authorize SSH connections.
- https://github.com/settings/keys
- New SSH key and copy in the SSH key that was printed out. It’ll begin with ssh-rsa and end with ubuntu@xxx
- Now that we have Github installed, we can pull down existing website.
- If you don’t include the destination folder in the command, the repo will go into the current folder with a new folder called the same as the repo name.
- Also, the /html folder must be empty for you to clone into it.
# CLONE THE nealalan.com REPO TO THE html/ FOLDER
$ git clone https://github.com/nealalan/nealalan.com.git ~/nealalan.com/html/
- If you make some changes, you’ll want to be able to push it back.
- Because we pulled the repo down using HTTPS (which is convenient because anyone could pull it down and use the code) we will need to change the repo to push back using SSH
- Note: If you would like, on github you can create a new repo called test.com and replace nealalan.com with test.com
# CHANGE THE GIT TO SSH ORIGIN
$ cd ~/nealalan.com/html
$ git remote set-url origin git@github.com:nealalan/nealalan.com.git
GIT PUSH A New Website to a New Repo
- Note: If you would like, on github you can create a new repo called test.com and replace nealalan.com with test.com
- Something that has annoyed me with GIT CLI is the ability to create a repo from the commandline. You are forced to go to the graphical website and create a new repo unless you add additional utilities.
- There is a utility called HUB that is bolted onto GIT.
- You will need to install Go (a language developed by Google).
- How to: Install Go 1.9.1 on Ubuntu 16.04
# DOWNLOAD & INSTALL GO
$ cd
$ sudo curl -O https://storage.googleapis.com/golang/go1.9.1.linux-amd64.tar.gz
$ sudo tar -xvf go1.9.1.linux-amd64.tar.gz
$ sudo mv go /usr/local
$ rm go1.9.1.linux-amd64.tar.gz
$ sudo nano ~/.profile
# ADD THE FOLLOWING LINE TO THE END OF .profile
#	export PATH=$PATH:/usr/local/go/bin
# REFRESH THE PROFILE
$ source ~/.profile
$ go

# DOWNLOAD & INSTALL HUB
$ git clone https://github.com/github/hub.git && cd hub
$ script/build -o ~/bin/hub

$ source ~/.profile
Security: Where we are now?
- CIA Triad
- Confidentiality - For purposes of a publically facing webserver keep what’s confidential internal and publically available marketing external. Setting up this webserver maintains confidentiality… which leads to the next vocab work…
- Integrity - Assuming controls are in place to prevent unauthorized individuals from tampering with or adding to the information on the server, the server is setup to maintain integrity. (I.e. Since I am the only one with access to this server, I know I won’t store my tax information here.)
- Availability - Hosting in the cloud. As of Feb 2018, AWS was the top IaaS provider per Stackify: Top IaaS Providers: 42 Leading Infrastructure-as-a-Service Providers to Streamline Your Operations.
- Lock down SSH access.
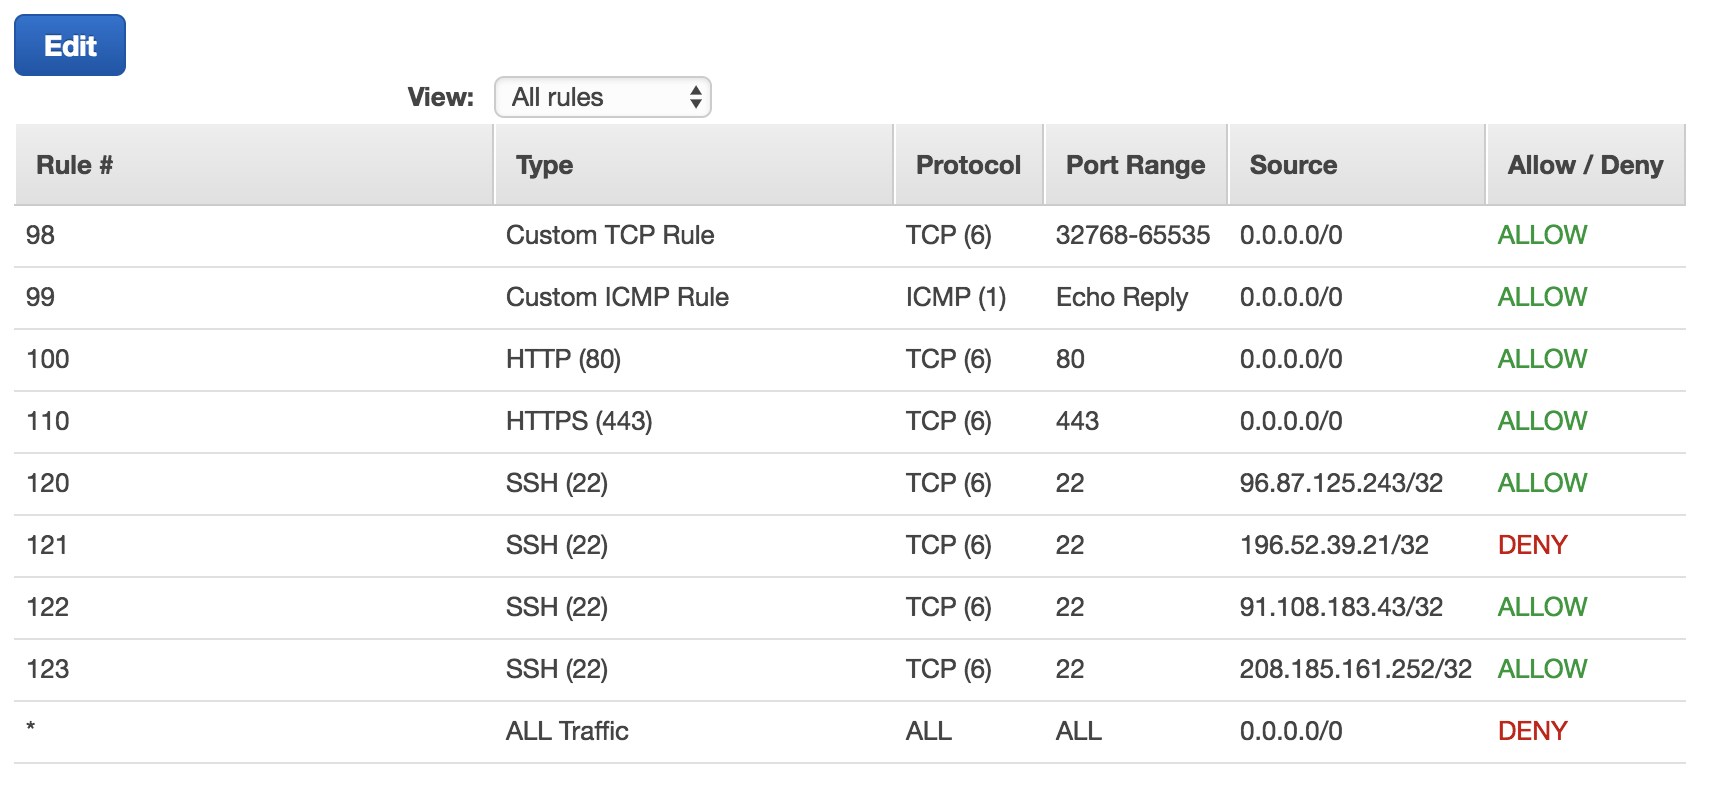
- I updated my VPC ACL list so SSH is only allowed via a few IP addresses. I turn these on as needed.
- You can see the DENY for specific IP addresses. I want to turn these on and off because others who use the same VPN provider I do would also have SSH access.
- ACLs require CIDR address format. Since everything accessing my box will likely be an internet IP, I’ll likely only ever have /32 addresses listed.
- Basic Testing
- First thing I’ll run is an nmap command
# USE CAUTIOUSLY AGAINST OTHERS $ sudo nmap -A -T5 -r -p 1-9999 nealalan.com - Check the HTTP security headers at https://securityheaders.io
- SSL Test at https://www.ssllabs.com/ssltest
- First thing I’ll run is an nmap command
FTP access and users
- I installed vsftpd using some current instructions on digitalocean. Installation of FTP will allow me to easily transfer images and html to and from the webserver.
- Since I’m running two sites, I setup the following:
- User: nealalan with access to nealalan.com and a symbolic link to the nealalan.com/html/ folder
- User: neonaluminum with access to neonaluminum.com and a symbolic link to the neonaluminum.com/html folders
- The fireware rules I applied are in the vsftpd instructrions as follows:
$ sudo ufw allow 20/tcp
$ sudo ufw allow 21/tcp
$ sudo ufw allow 990/tcp
$ sudo ufw allow 40000:50000/tcp
$ sudo ufw status
To be continued…
Auto Update Route 53
NOTE: This is no longer needed, since Amazon is nice enough to include a free static IP address. You can set this up from the AWS Console: EC2 Dashboard: Elastic IPs.
- Now we have our webservers up and running, we need to be able to take our server up and down and for it to recover successful. This means the DNS A records will need to be updated to match the newly assigned static IP addresses.
- We will accomplish this with a script running BASH code that is initiated as one of the last scripts at startup. We need to make sure networking is up and running before we try to do this, or we won’t have a public IP address and won’t have a way to send that update to the DNS record.
- First lets go ahead and reboot our server from the command line
$ sudo reboot now -
You will need to get the new IP address from the EC2 Dashboard and update your Route 53 DNS A type records like we did before.
- setup a bash script to automatically run upon instance load to update the DNS record to the correct public IP address
- nealalan/update_route53
- This will allow you to ssh into your instance using the domain name instead of the newly assigned public IP address