AWS-Email-Forwarder
AWS Email Forwarder for almost free
nealalan.github.io/AWS-Email-Forwarder
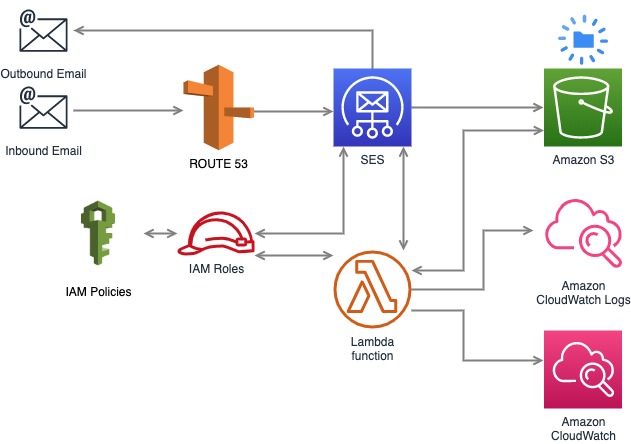
Use Route 53, SES, S3 & Lambda to implement an email forwarder via the AWS CLI. (Not via the console.)
My use case is I simply want to forward any email to my domain name to my gmail account. Using the G Suit has a US$4-5/mo cost that I have no reason to incur.
I originally received the motivation to work on this from the aws-lambda-ses-forwarder repo, but I found myself wanting a greater understanding of how all the pieces worked and integrated. I particularly wanted to understand the resource access and security.
ASSUMPTIONS
- The Amazon Simple Email Service (SES) free tier] allows for 62000 emails month. Inbound Data use is US$.09/1000-256kb chunks (or about 250mb). Outgoing attachments are US$0.12 per GB. (Just don’t send attachments!)
- This setup isn’t intended to send email. We will be implementing resources and logic to forward any email address on abc.neonaluminum.com to a gmail account. There are ways to more granularly break the forwarding, so for example help@xyz.neonaluminum.com would be routed to a different address than neal@xyz.neonaluminum.com and admin@xyz.neonaluminum.com could be returned to sender as undeliverable.
- You will need a domain name registered. That’s the point, really.
- If you register through another Domain Registrar (cheaper for the first year), you will need to create a Hosted Zone in Amazon Route53.
- Once the Hosted Zone is created, you will have Name Server records to add to your domain on the Domain Registrar site.
- Note: Hosted zones cost US$0.50 per month. I usually have AWS credits from going to AWS hosted events, so don’t incur any cost.
- I’m using MacOS. (You can use any Linux OS. For Windows, you’ll need to lookup how to execute some commands if they don’t work for you.) My local working directory will be ~/Projects/AWS/EmailForwarder. Also, I generally backup project files in a Private Github repository. This project will automatically be stored in my Private AWS repo.
- You could setup Amazon Simple Notification Service (SNS) to notify you, I don’t need this and am opting out of the extra complexity right now.
SECURITY
- We will be using AWS Identity & Access Management (IAM) to create security policies and roles.
- Per AWS Security Best Practices, you should use a separate IAM user created from the AWS Console. This user should be setup to use the AWS CLI.
- I will be implementing this profile using two accounts: One with my Route53 Hosted Zones and the other for everything else. Because of this, all of my commands will be executed using a
--profileflag. Thos flag will specify to the AWS CLI which IAM Account access keys to use.
STEPS FOR IMPLEMENTATION
1. SETUP THE DEFAULT REGION FOR SES
$ aws configure set region us-east-1 \
  --profile neonaluminum
2. CREATE AN S3 BUCKET
$ aws s3 mb s3://xyz.neonaluminum.com \
  --profile neonaluminum
3. VERIFY THE BUCKET IS CREATED
$ aws s3 ls \
  --profile neonaluminum

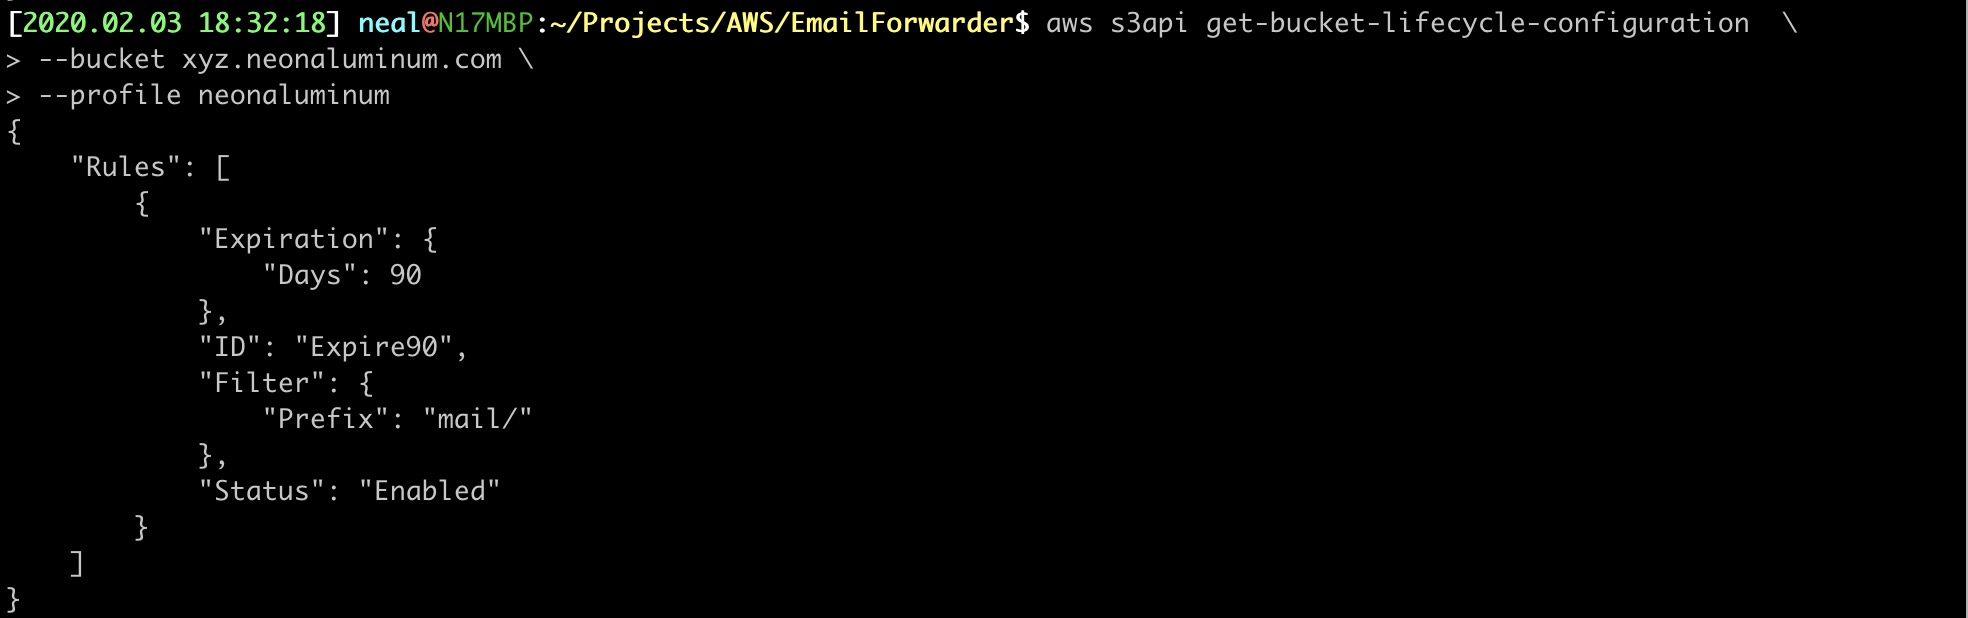
4. CREATE A BUCKET LIFECYCLE POLICY FILE
Create a new file called S3-lifecycle.json to enable a 90 automatic removal for all object in the S3 bucket labeled mail/.
{
   "Rules": [
       {
           "Filter": {
               "Prefix": "mail/"
           },
           "Status": "Enabled",
           "Expiration": {
               "Days": 90
           },
           "ID": "Expire90"
       }
   ]
}
5. APPLY THE BUCKET LIFECYCLE CONFIGURATION
Using the lifecycle config, you can migrate files to less redundant, less available and less costly storage. Since we don’t really care about these emails past when they are sent (almost immediately), we will store them for 90 days. If you wanted to view emails that were never forwarded because of an error (invalid or unverified To: address), you can see them in S3 prior to deletion.
$ aws s3api put-bucket-lifecycle-configuration  \
  --bucket xyz.neonaluminum.com  \
  --lifecycle-configuration file://S3-lifecycle.json \
  --profile neonaluminum
6. VERIFY THE BUCKET LIFECYCLE CONFIGURATION
$ aws s3api get-bucket-lifecycle-configuration  \
  --bucket xyz.neonaluminum.com \
  --profile neonaluminum
7. QUERY THE ACCOUNT ID
A 12-digit account number will be displayed. Save this in your notes for later use.
$ aws sts get-caller-identity \
  --query Account \
  --output text \
  --profile neonaluminum
8. CREATE A BUCKET POLICY FILE
Create a new file called S3-bucket-policy.json. You need to change the bucket name under the “Resource” key and change the “aws:Referer” number to your ACCOUNT ID.
{
   "Version": "2012-10-17",
   "Statement": [
       {
           "Sid": "AllowSESPuts",
           "Effect": "Allow",
           "Principal": {
               "Service": "ses.amazonaws.com"
           },
           "Action": "s3:PutObject",
           "Resource": "arn:aws:s3:::xyz.neonaluminum.com/*",
           "Condition": {
               "StringEquals": {
                   "aws:Referer": "020184898418"
               }
           }
       }
   ]
}
9. APPLY THE BUCKET POLICY
$ aws s3api put-bucket-policy \
  --bucket xyz.neonaluminum.com \
  --policy file://S3-bucket-policy.json \
  --profile neonaluminum
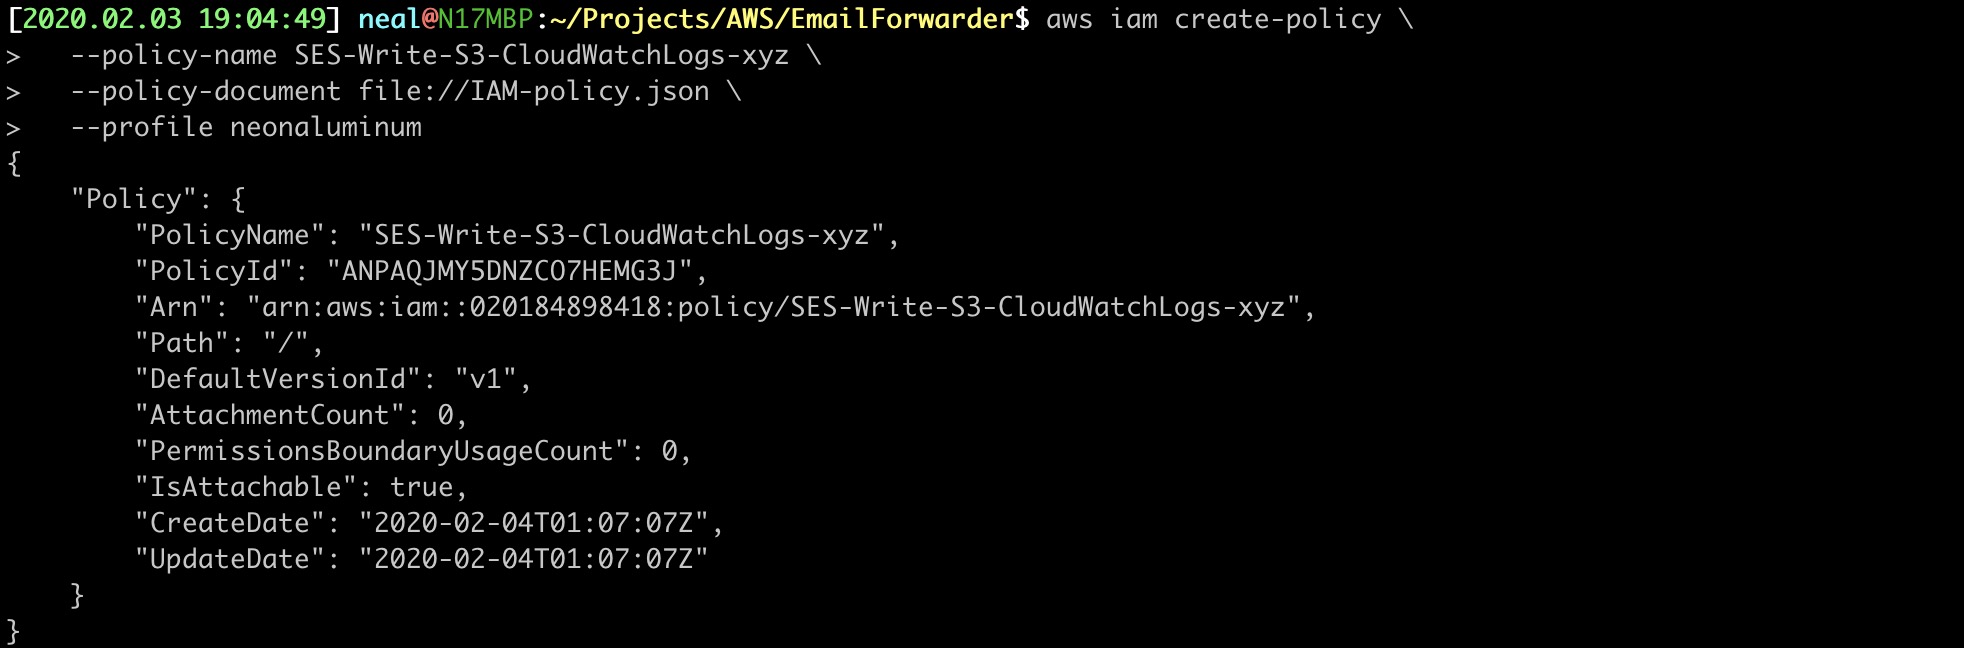
10. CREATE A NEW IAM POLICY
Create an Identity & Access Management Policy file called IAM-policy.json. This will specifically give access for SES to write out an S3 object for each piece of mail received and create a CloudWatch Event Log.
You will need to update the S3 bucket listed and the account ID in this file.
{
    "Version": "2012-10-17",
    "Statement": [
        {
            "Effect": "Allow",
            "Action": [
                "ses:SendEmail",
                "logs:CreateLogStream",
		"logs:CreateLogGroup",
                "ses:SendRawEmail",
                "logs:PutLogEvents"
            ],
            "Resource": "*"
        },
        {
            "Effect": "Allow",
            "Action": [
                "s3:PutObject",
                "s3:GetObject"
            ],
            "Resource": "arn:aws:s3:::xyz.neonaluminum.com/*"
        }
    ]
}
11. APPLY THE NEW IAM POLICY
$ aws iam create-policy \
  --policy-name SES-Write-S3-CloudWatchLogs-xyz \
  --policy-document file://IAM-policy.json \
  --profile neonaluminum
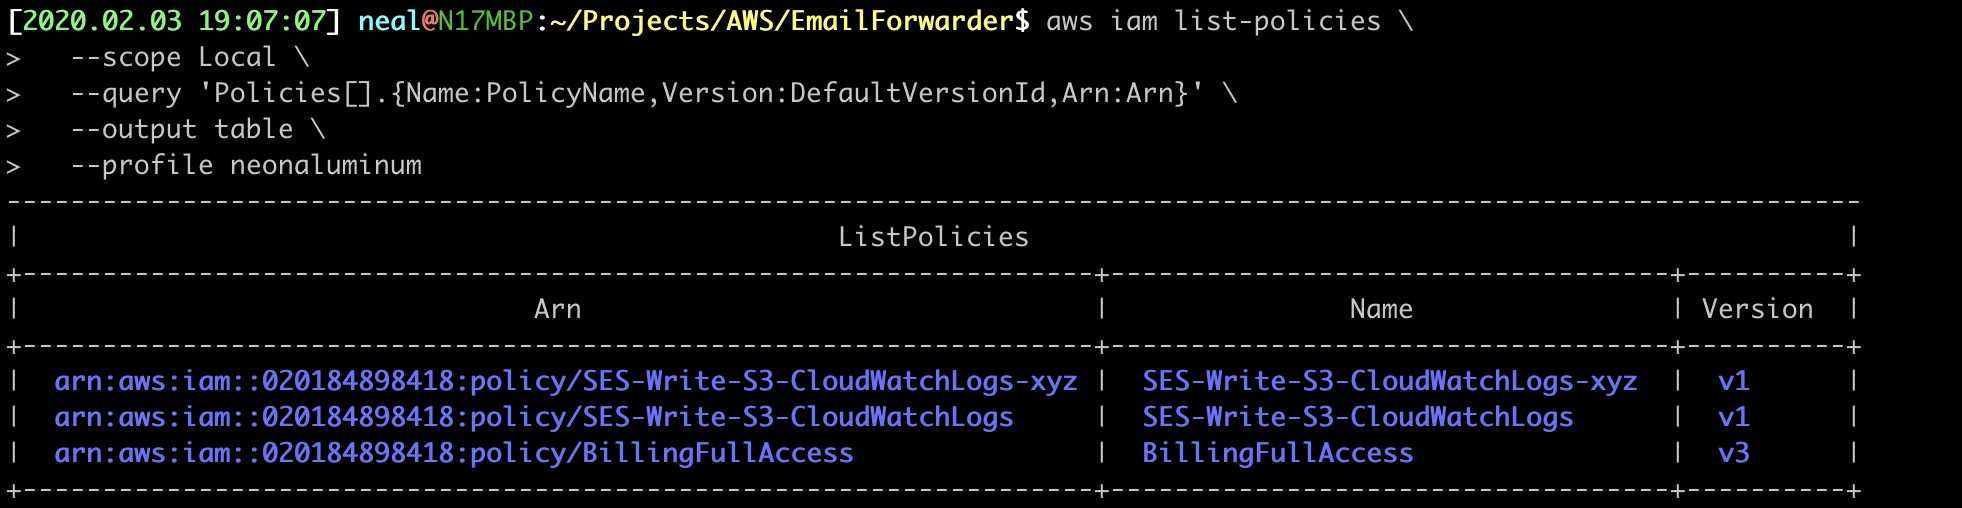
12. VERIFY THE POLICY
$ aws iam list-policies \
  --scope Local \
  --query 'Policies[].{Name:PolicyName,Version:DefaultVersionId,Arn:Arn}' \
  --output table \
  --profile neonaluminum
13. GET POLICY DETAILS
You need the policy Arn and Version to query the specificy policy.
$ aws iam get-policy-version \
  --policy-arn arn:aws:iam::020184898418:policy/SES-Write-S3-CloudWatchLogs-xyz \
  --version-id v1 \
  --profile neonaluminum
I’ll spare the screenshot. It should resemble the IAM-policy.json file.
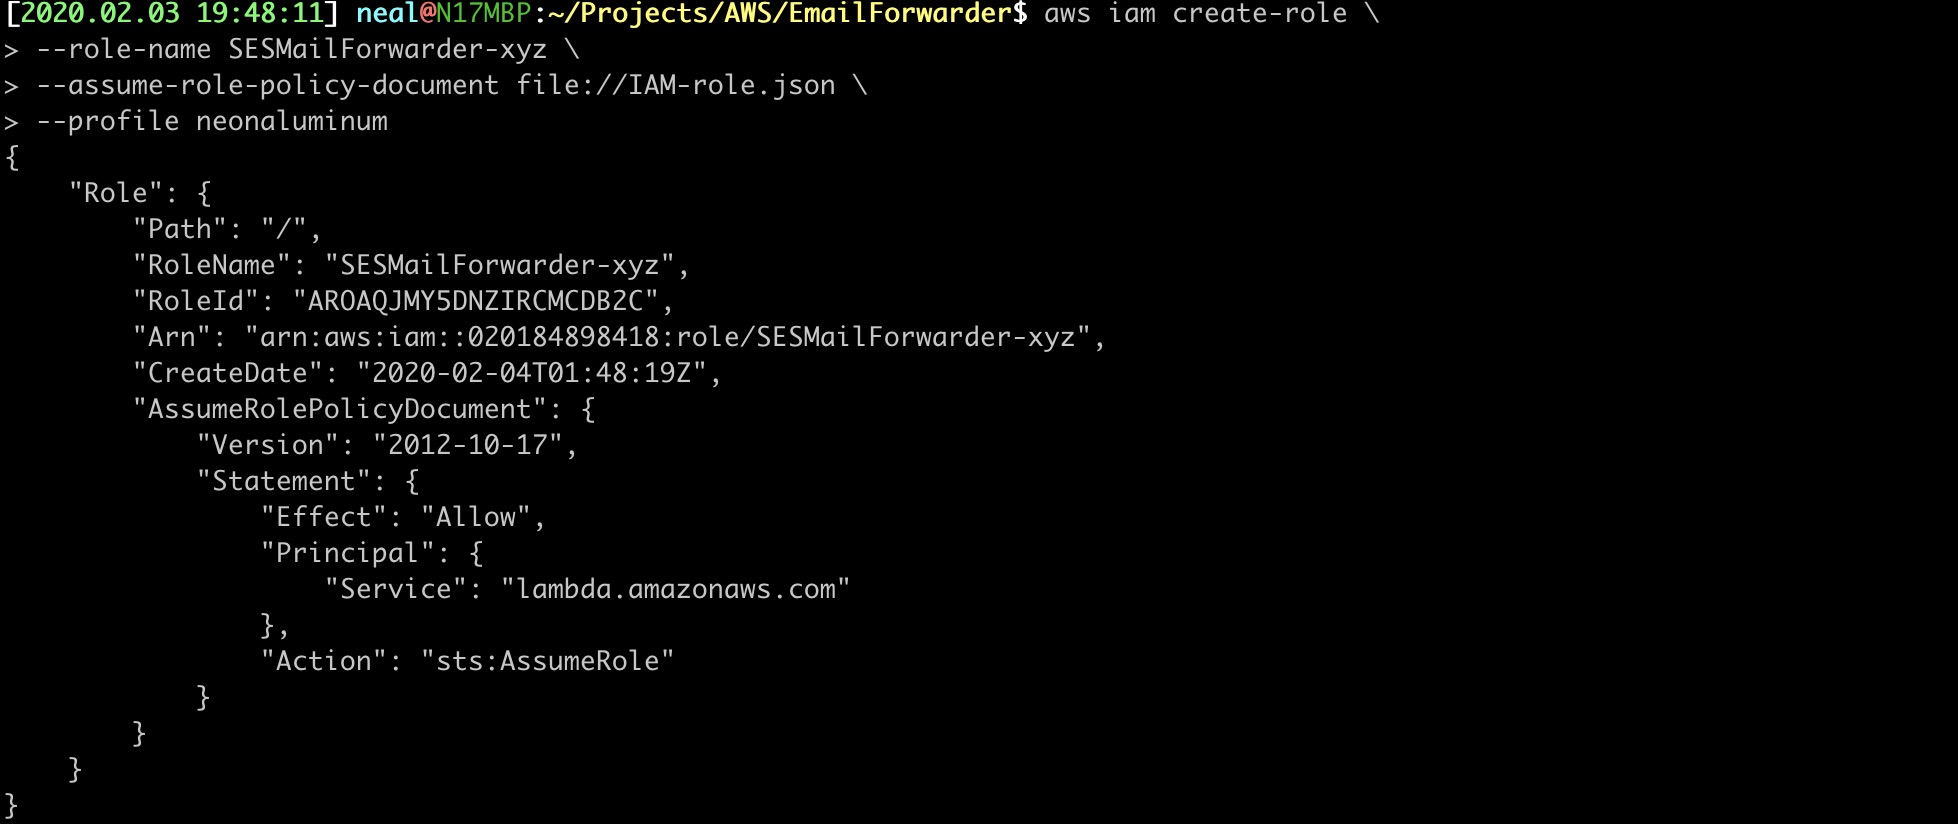
14. CREATE AN IAM ROLE
Create an IAM role file called IAM-role.json. This will create a trusted relationship with Lambda to allow use of the policy we created.
{
   "Version": "2012-10-17",
   "Statement": {
       "Effect": "Allow",
       "Principal": {
           "Service": "lambda.amazonaws.com"
       },
       "Action": "sts:AssumeRole"
   }
}
15. APPLY THE IAM ROLE FILE
aws iam create-role \
  --role-name SESMailForwarder-xyz \
  --assume-role-policy-document file://IAM-role.json \
  --profile neonaluminum
16. VERIFY THE ROLE
Using the --query flag, we can narrow down the results to only roles starting with SES and format the output into a table containing the RoleName and Role Arn. This is much more readable than JSON.
$ aws iam list-roles \
  --query 'Roles[?starts_with(RoleName,`SES`) == `true`].{RoleName:RoleName,Arn:Arn}' \
  --output table \
  --profile neonaluminum
Your output will only list one, unless you already have roles starting with SES.

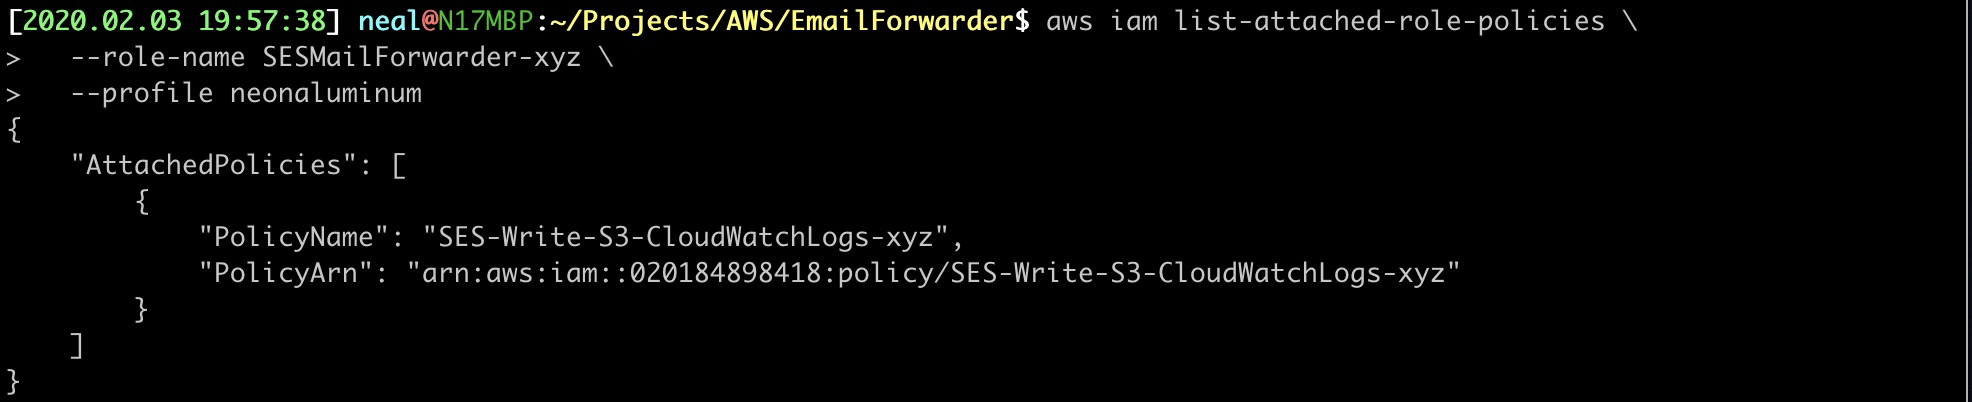
17. ATTACH POLICY TO THE ROLE
Use the Policy ARN from above and update the newly created role-name here.
$ aws iam attach-role-policy \
  --policy-arn arn:aws:iam::020184898418:policy/SES-Write-S3-CloudWatchLogs-xyz \
  --role-name SESMailForwarder-xyz \
  --profile neonaluminum
18. VERITY THE POLICY IS ATTACHED TO THE ROLE
$ aws iam list-attached-role-policies \
  --role-name SESMailForwarder-xyz \
  --profile neonaluminum
19. PULL THE CODE USED IN THE LAMBDA FUNCTION
Pull down the pre-written Javascript function that we will modify add to a new Lambda function.
$ curl https://raw.githubusercontent.com/arithmetric/aws-lambda-ses-forwarder/master/index.js > aws-lambda-ses-forwarder.js
20. EDIT THE JAVASCRIPT CODE
Make the following changes:
- fromEmail: noreply@example.com changed to noreply@xyz.neonaluminum.com
- subjectPrefix: from “” to “FWD: ” (I do this so I know this email was forwarded to me)
- emailBucket: s3-bucket-name to xyz.neonaluminum.com
- emailKeyPrefix: “emailsPrefix/” to “email/”
- forwardMapping: There are a bunch of entries and you only need to change or apply what applies to you. Only email from the registered domain name will be processed by the Lambda function. Therefore, I changed: “@example.com”: [ “example.john@example.com” ] TO “@xyz.neonaluminum.com”: [ “neonaluminum0@gmail.com” ]
- Save the JavaScript function
- Archive the function into a ZIP file
$ zip aws-lambda-ses-forwarder.zip aws-lambda-ses-forwarder.js
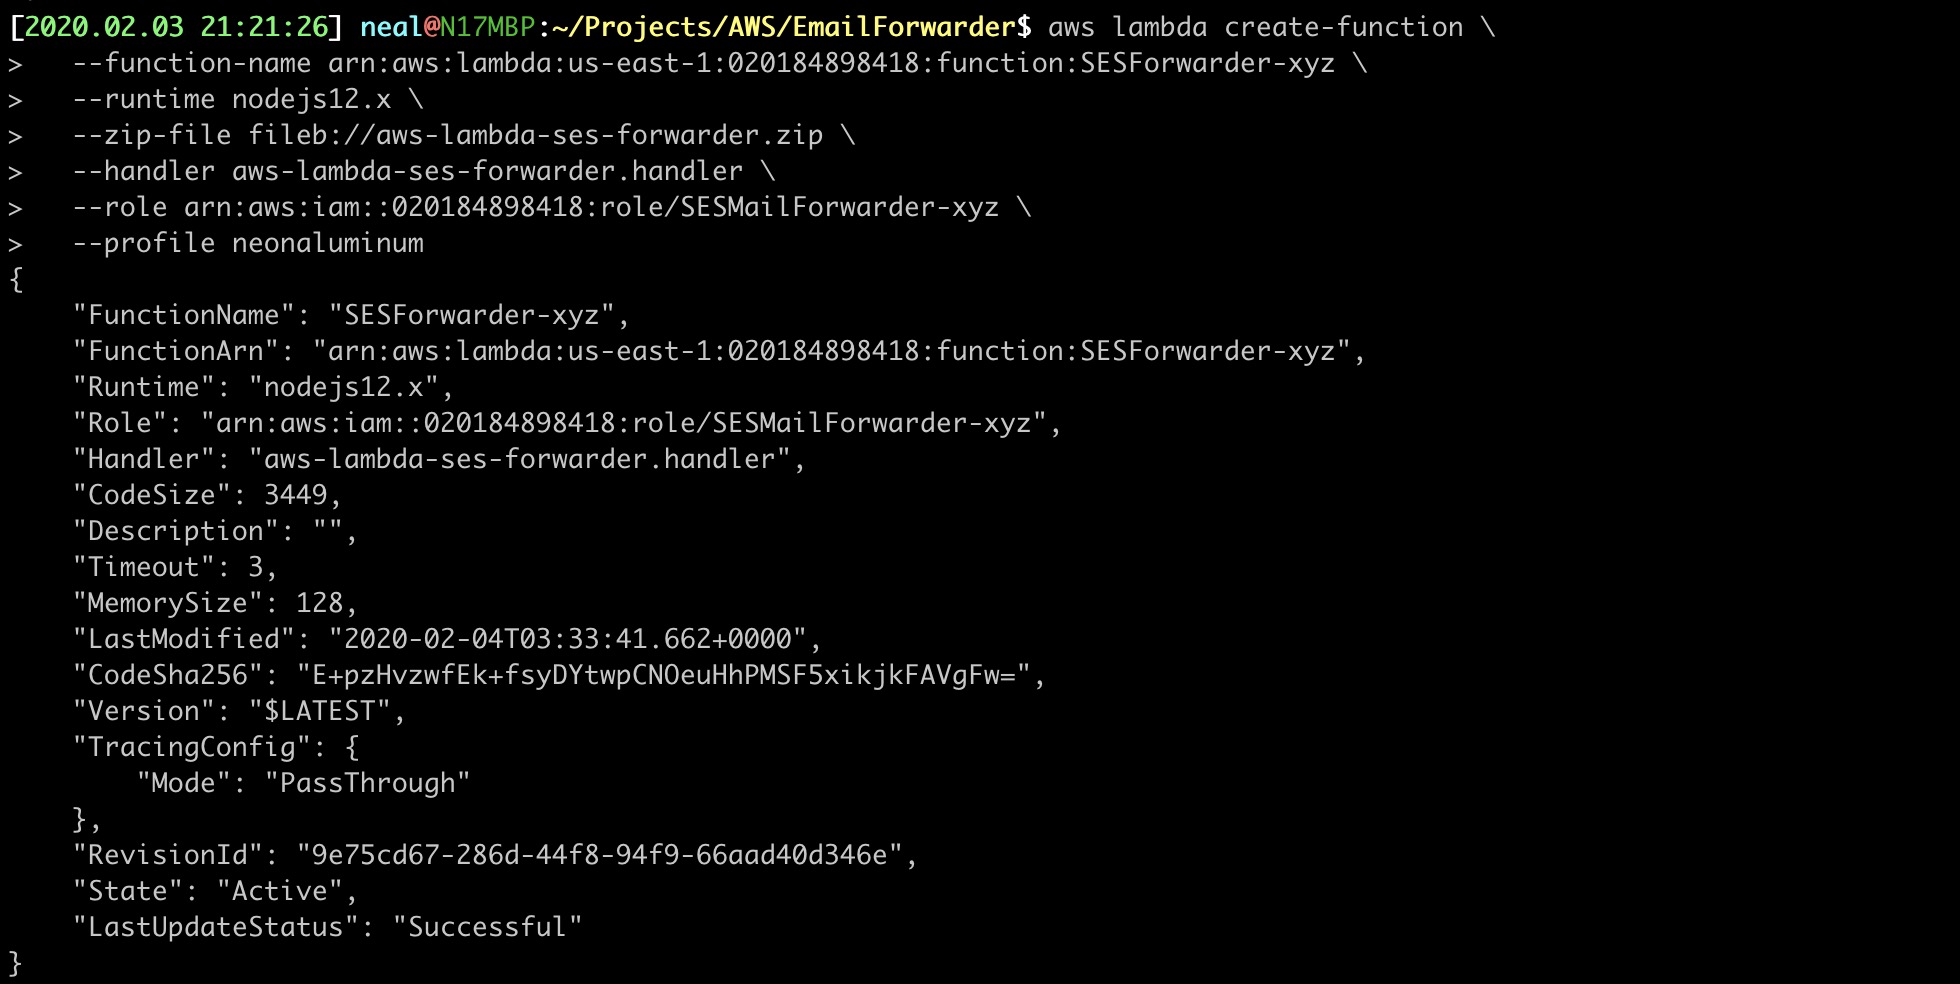
21. CREATE THE LAMBDA FUNCTION ON AWS
Use the following data for the command flags:
- Function name: The default region you used in STEP 1 and what you call the function SESForwarder-xyz.
- Runtime environment: We will use nodejs12.x. The runtime list may change in the future.
- Handler: the JS file name we archived plus .handler.
- Role Arn: from STEP 16.
$ aws lambda create-function \
  --function-name arn:aws:lambda:us-east-1:020184898418:function:SESForwarder-xyz \
  --runtime nodejs12.x \
  --zip-file fileb://aws-lambda-ses-forwarder.zip \
  --handler aws-lambda-ses-forwarder.handler \
  --role arn:aws:iam::020184898418:role/SESMailForwarder-xyz \
  --profile neonaluminum
You should see “Successful” at the bottom of the output.
MAKING THE LAMBDA FUNCTION EXECUTE - We have two ways this can happen.
- S3 Events can be setup to execute the Lambda function upon a new object creation or
- SES can be setup to place the email into an S3 bucket and then call the Lambda function. We will us this method.
22. QUERY THE ROUTE 53 HOSTED DONE ARN
Note: Everything I do with Route 53 in my example will use the --profile update-dns flag. This is because I have all domains and hosted zones in a separate AWS account.
$ aws route53 list-hosted-zoned-by-name \
  --dns-name neonaluminum.com \
  --query 'HostedZones[].{Id:Id,Name:Name,Recs:ResourceRecordSetCount}' \
  --output table \
  --profile update-dns
OPTIONAL: If you don’t know the Hosted Zone, you can get all:
$ aws route53 list-hosted-zones \
  --query 'HostedZones[].{Id:Id,Name:Name,Recs:ResourceRecordSetCount}' \
  --output table \
  --profile update-dns
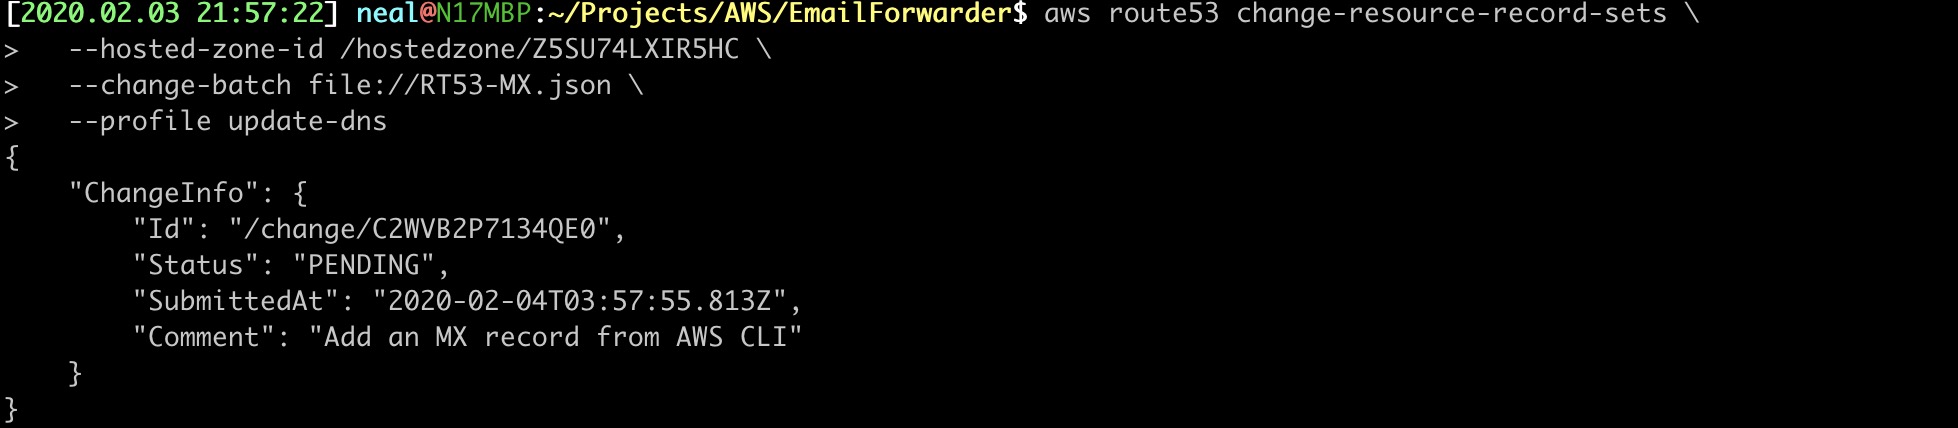
23. CREATE THE MX DNS RECORD
Create an MX DNS records file called RT53-MX.json. Edit the “ResourceRecordSet” Name. If you aren’t going to be using the zone us-east-1 then change it to your AZ.
{
   "Comment": "Add an MX record from AWS CLI",
   "Changes": [{
       "Action": "CREATE",
       "ResourceRecordSet": {
           "Name": "xyz.neonaluminum.com",
           "Type": "MX",
           "TTL": 300,
           "ResourceRecords": [
           {
               "Value": "10 inbound-smtp.us-east-1.amazonaws.com"
           }
           ]
       }
   }]
}
NOTE: This will add a new DNS record to AWS immediately, however the record may take minutes to cascade out to internet DNS servers.
24. APPLY THE MX DNS RECORD
The --hosted-zone-id is populated with the Id value from STEP 22.
$ aws route53 change-resource-record-sets \
  --hosted-zone-id /hostedzone/Z5SU74LXIR5HC \
  --change-batch file://RT53-MX.json \
  --profile update-dns
OUTPUT:
25. QUERY THE ROUTE 53 HOSTED ZONE DNS RECORDS
Using the Hosted Zone ID or Amazon Resource Name (ARN) listed, query the DNS records. Here we will look up all existing MX records and list them in a table.
$ aws route53 list-resource-record-sets \
  --hosted-zone-id /hostedzone/Z5SU74LXIR5HC \
  --query "ResourceRecordSets[?Type == 'MX'].{Name:Name,Type:Type}" \
  --output table \
  --profile update-dns
26. VERIFY ACCESS TO THE DOMAIN NAME USING SES
Before we can configure Amazon SES to receive email for your domain, you must prove you own the domain. This command will request for SES to create a VerificationToken that we will add to the Route 53 HostedZone DNS records.
$ aws ses verify-domain-identity \
  --domain xyz.neonaluminum.com \
  --output table \
  --profile neonaluminum
Output:

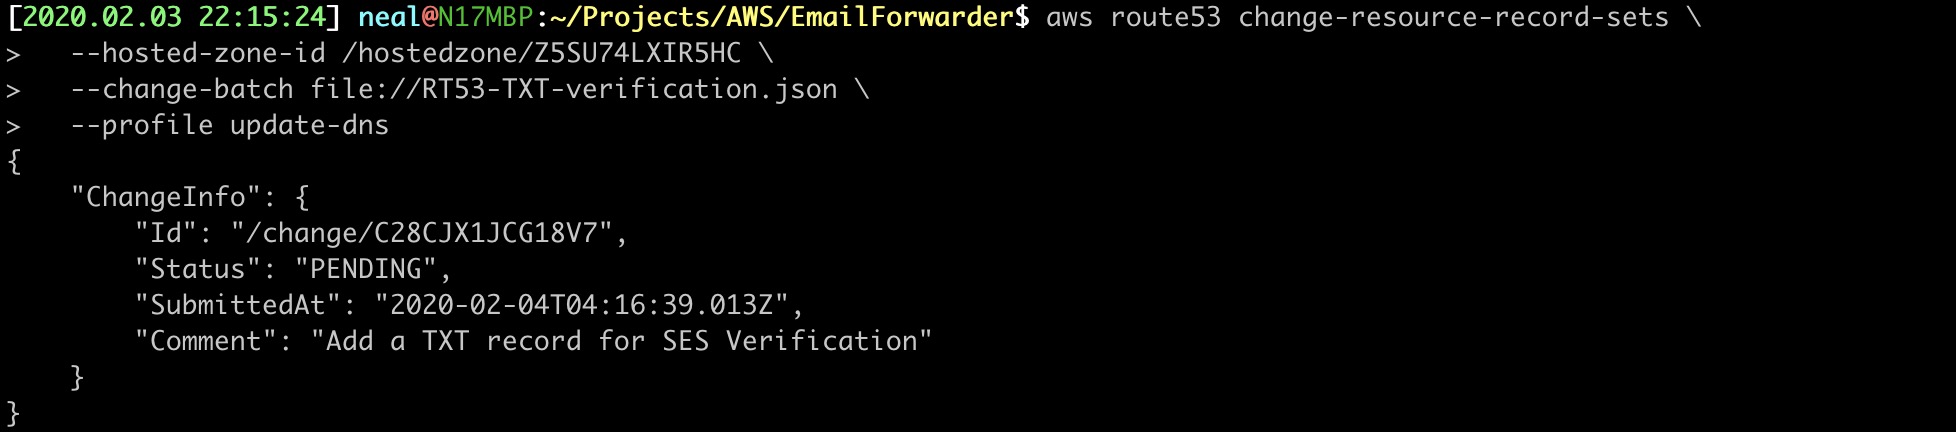
27. CREATE THE TXT DNS RECORD FOR SES VERIFICATION
Create the new TXT record set in a file called RT53-TXT-verification.json.
- Name field: your domain with _amazonses before it
- ResourceRecords Value: This will be the Verification Token! Be sure to leave
"\\and\\"as a part of the value.
{
   "Comment": "Add a TXT record for SES Verification",
   "Changes": [{
       "Action": "CREATE",
       "ResourceRecordSet": {
           "Name": "_amazonses.xyz.neonaluminum.com",
           "Type": "TXT",
           "TTL": 1800,
           "ResourceRecords": [
           {
               "Value": "\"K3M7E5+hD2EVwufopuxhADZtJyQ4fLLjsD0nkHs0tow=\""
           }
           ]
       }
   }]
}
28. APPLY THE TXT DNS RECORD
$ aws route53 change-resource-record-sets \
  --hosted-zone-id /hostedzone/Z5SU74LXIR5HC \
  --change-batch file://RT53-TXT-verification.json \
  --profile update-dns
Output:
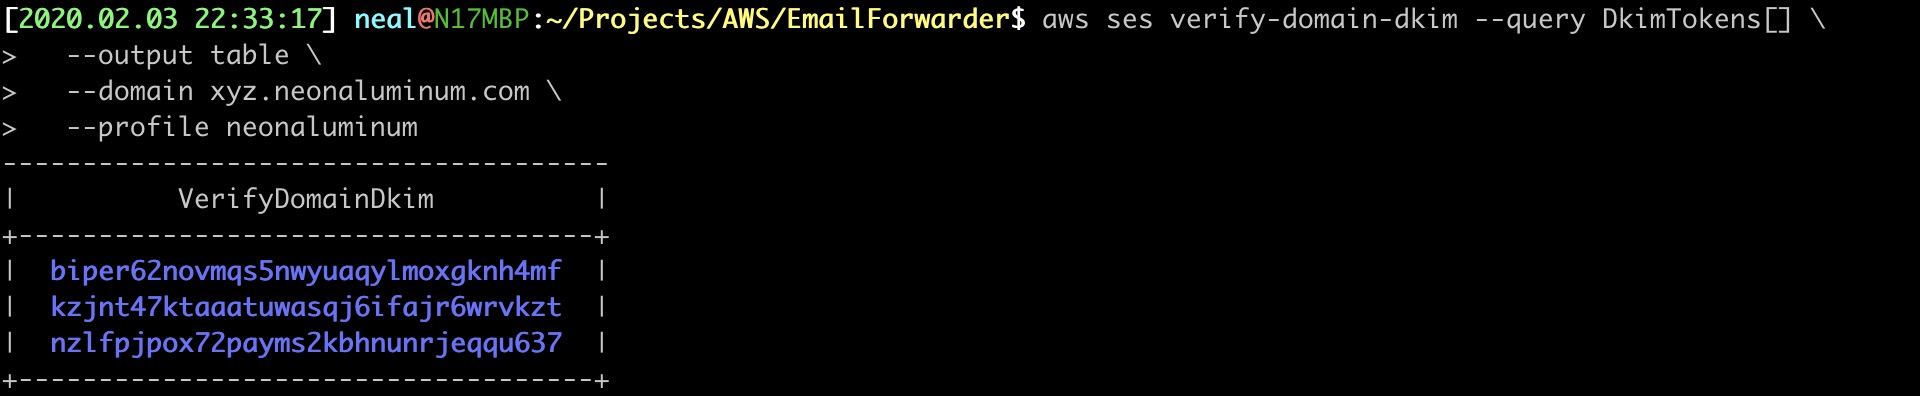
29. GENERATE SES DKIM VALUES
The DomainKeys_Identified_Mail CNAME DNS records help detect forged sender addresses. This security measure is increasing help stop spam from forged addresses. (Someone pretending they are support@apple.com in an email to you.
$ aws ses verify-domain-dkim --query DkimTokens[] \
  --output table \
  --domain xyz.neonaluminum.com \
  --profile neonaluminum
Output:
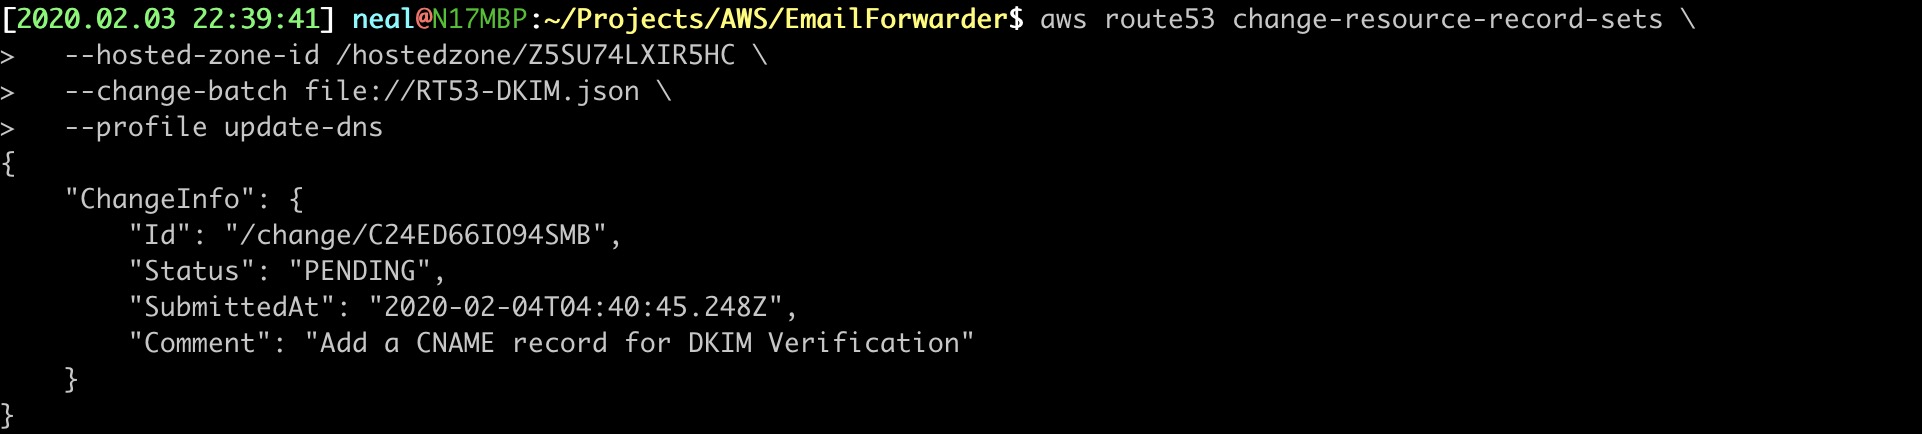
30. CREATE THE CNAME DNS RECORDS USING THE DKIM VALUES
Create the new CNAME record set in a file called RT53-DKIM.json. Note: You need to update the ResourceRecordSet and Value for each of the three DomainKeys.
{
    "Comment": "Add a CNAME record for DKIM Verification",
    "Changes": [ {
        "Action": "CREATE",
        "ResourceRecordSet": {
            "Name": "biper62novmqs5nwyuaqylmoxgknh4mf._domainkey.xyz.neonaluminum.com.",
            "Type": "CNAME",
            "TTL": 1800,
            "ResourceRecords": [
                {
                    "Value": "biper62novmqs5nwyuaqylmoxgknh4mf.dkim.amazonses.com"
                }
            ]
        }
    },{
        "Action": "CREATE",
        "ResourceRecordSet": {
            "Name": "kzjnt47ktaaatuwasqj6ifajr6wrvkzt._domainkey.xyz.neonaluminum.com.",
            "Type": "CNAME",
            "TTL": 1800,
            "ResourceRecords": [
                {
                    "Value": "kzjnt47ktaaatuwasqj6ifajr6wrvkzt.dkim.amazonses.com"
                }
            ]
        }
    },{
        "Action": "CREATE",
        "ResourceRecordSet": {
            "Name": "nzlfpjpox72payms2kbhnunrjeqqu637._domainkey.xyz.neonaluminum.com.",
            "Type": "CNAME",
            "TTL": 1800,
            "ResourceRecords": [
                {
                    "Value": "nzlfpjpox72payms2kbhnunrjeqqu637.dkim.amazonses.com"
                }
            ]
        }
    }
    ]
 }
31. APPLY THE CNAME DNS RECORDS
$ aws route53 change-resource-record-sets \
  --hosted-zone-id /hostedzone/Z5SU74LXIR5HC \
  --change-batch file://RT53-DKIM.json \
  --profile update-dns
Output:
32. VERIRY THE CNAME DNS RECORDS AND DKIM VALUES
aws route53 list-resource-record-sets \
  --hosted-zone-id /hostedzone/Z5SU74LXIR5HC \
  --query "ResourceRecordSets[?Type == 'CNAME'].{Name:Name}" \
  --output table \
  --profile update-dns
33. OPTIONAL: VIEW ALL DNS RECORDS AND SAVE TO A TEXT FILE
$ aws route53 list-resource-record-sets \
  --hosted-zone-id /hostedzone/Z5SU74LXIR5HC \
  --query "ResourceRecordSets[].{Name:Name,Type:Type,ResourceRecords:ResourceRecords[0].Value}" \
  --output table \
  --profile update-dns >> ALL-DNS-RECORDS.TXT
You can view the ALL-DNS-RECORDS.TXT to review all your DNS records.
34. CREATE, VERIFY & ACTIVATE A BLANK SES RULE SET
You can only have one active rule set at a time.
This command will error if you already have a rule set, you may only need to add rules to the rule set. These instructions will not branch off in the direction of cloning or staging new rule sets.
$ aws ses create-receipt-rule-set \
  --rule-set-name default-rule-set \
  --profile neonaluminum
Verify the rule set was created
$ aws ses list-receipt-rule-sets \
  --query 'RuleSets[].{Name:Name}' \
  --output table  \
  --profile neonaluminum
Activate the rule set
$ aws ses set-active-receipt-rule-set \
  --rule-set-name default-rule-set \
  --profile neonaluminum
Verify the rule set is activated - If the rule set name is not listed, it’s not activated.
$ aws ses describe-active-receipt-rule-set \
  --profile neonaluminum
35. GRANT SES PERMISSION TO INVOKE THE NEW FUNCTION
This set is automatic if using the AWS Console to create you rule set. Since we are using the command line, we need to manually give permission.
Note: Initially trying to add rules to the rule set, I was stumped for a number of hours with a message “An error occurred (InvalidLambdaFunction) when calling the CreateReceiptRule operation: Could not invoke Lambda function:” I found the solution in the AWS Developers Guide: Giving Permissions to Amazon SES for Email Receiving
$ aws lambda add-permission \
  --function-name SESForwarder-xyz \
  --statement-id GiveSESPermissionToInvokeFunction \
  --action lambda:InvokeFunction \
  --principal ses.amazonaws.com \
  --profile neonaluminum
36. CREATE RULES TO THE SES RULE SET
Create a file called SES-rule-set.json.
{
   "Name": "xyz.neonaluminum.com-rules",
   "Enabled": true,
   "TlsPolicy": "Optional",
   "Recipients": ["xyz.neonaluminum.com"],
   "Actions": [
     {
       "S3Action": {
         "BucketName": "xyz.neonaluminum.com",
         "ObjectKeyPrefix": "email/"
       }
   },{
       "LambdaAction": {
         "FunctionArn": "arn:aws:lambda:us-east-1:020184898418:function:SESForwarder-xyz",
         "InvocationType": "Event"
       }
     }
   ],
   "ScanEnabled": true
 }
If you need the Lambda function Arn, replace the function name with your own and run the command:
$ aws lambda get-function \
  --function-name SESForwarder-xyz \
  --query 'Configuration.{Name:FunctionName,Arn:FunctionArn}' \
  --profile neonaluminum
37. APPLY THE RULES TO THE SES RULE SET
$ aws ses create-receipt-rule \
  --rule-set-name default-rule-set \
  --rule file://SES-rule-set.json \
  --profile neonaluminum
38. VERIFY THE FULL DEFAULT RULE SET
aws ses describe-active-receipt-rule-set \
  --profile neonaluminum
39. ADD THE FORWARD DESTINATION EMAIL ADDRESS
For each destination email address you added to the Lamba function, you will need to verify in SES this is a valid email address. An email will be sent to each email address. You will need to click the verification link.
$ aws ses verify-email-identity \
  --email-address neonaluminum0@gmail.com \
  --profile neonaluminum
40. CHECK THE EMAIL ADDRESS VERIFICATION STATUS
$ aws ses get-identity-verification-attributes \
  --identities neonaluminum0@gmail.com \
  --output table \
  --profile neonaluminum
Also, you can list all address identities using:
aws ses list-identities \
  --output table \
  --profile neonaluminum
COMPLETE? TEST IT OUT
Send an email to any name@your-domain.com and then check your forwarding email address!
If it works, you should see an email like the screenshot!
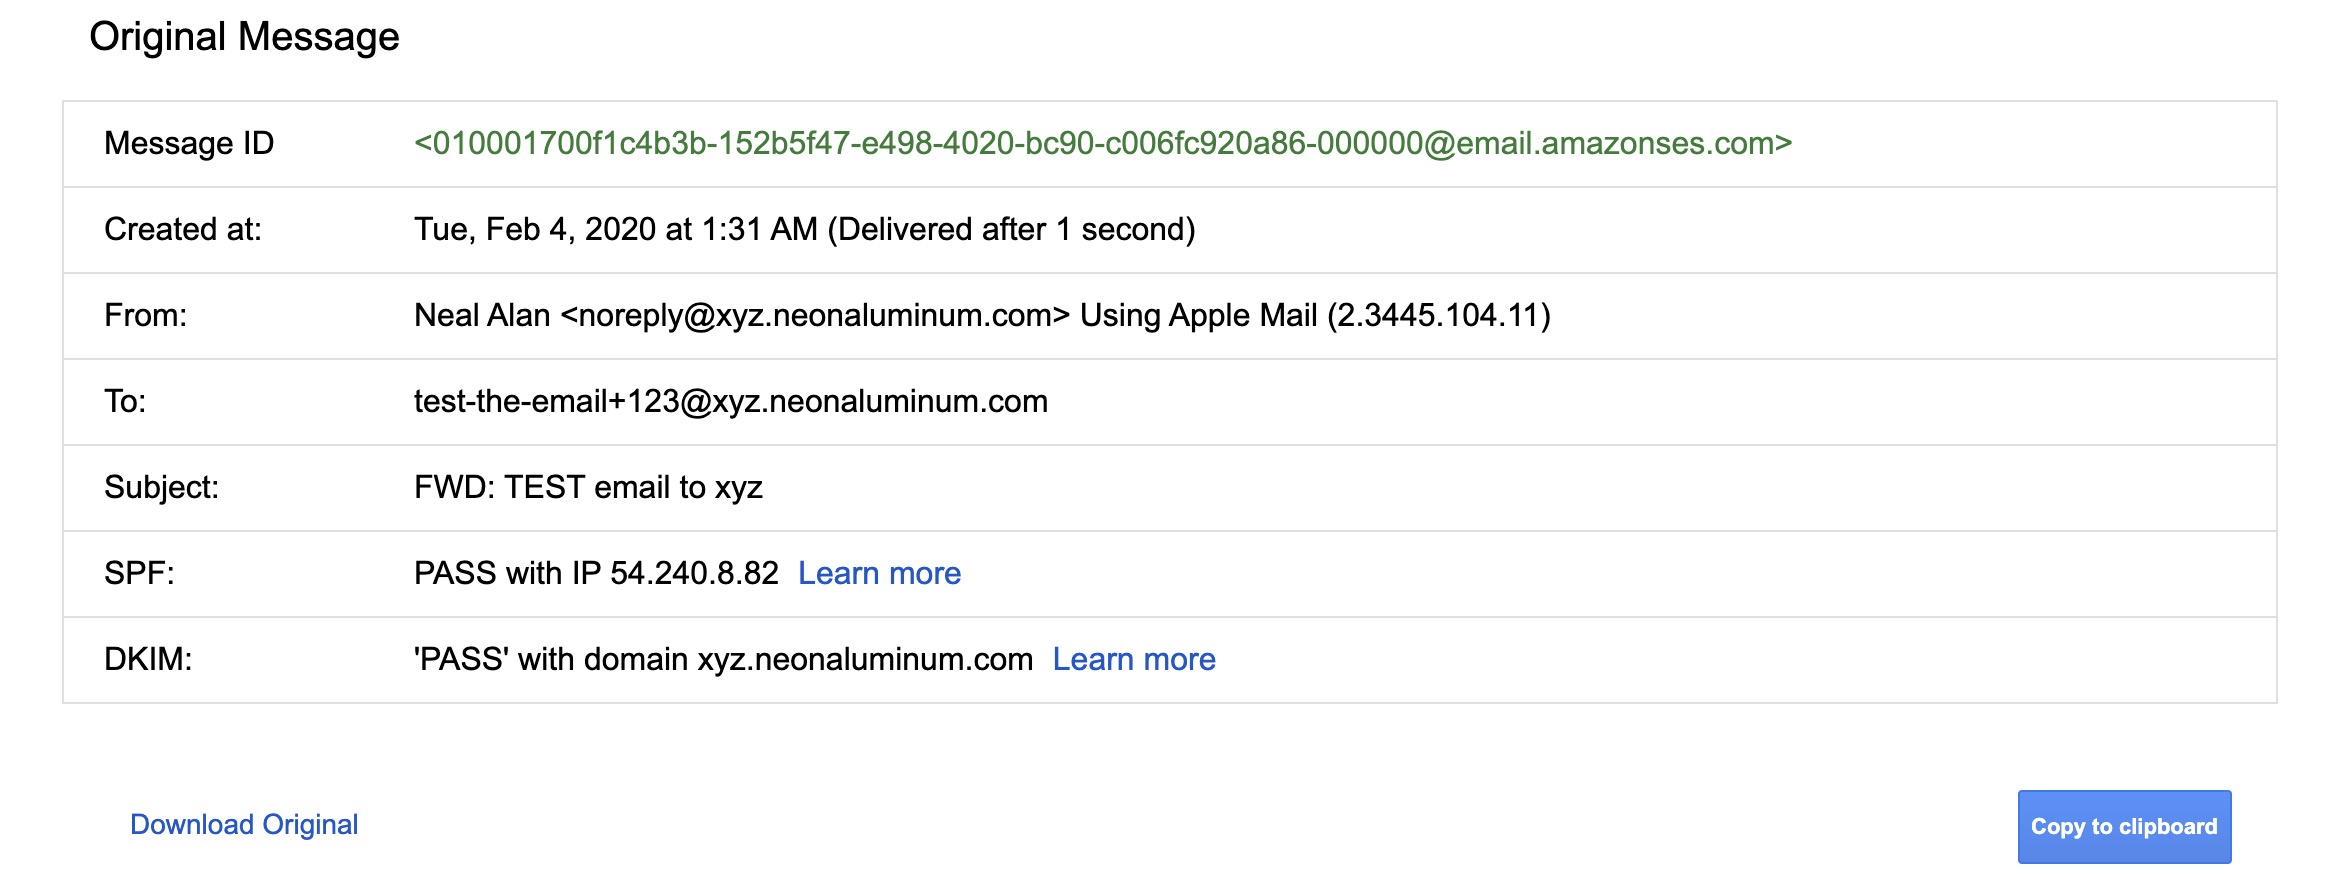
The Reply-To: field contains the original sender of the email also. If I click “Reply”, the message will route correctly, only from my email address.
TROUBLESHOOTING
Check Lambda CloudWatch Dashboard
Under Lambda: Your-function: Monitoring: CloudWatch Metrics: You can tell a number of things right away here. - Was the function called? - Did the function error?

Under Lambda: Your-function: Monitoring: CloudWatch Logs Insights: You find more detail from the function console logs.

Click the drop downs to get a better idea where the error comes from.

Check IAM Policies
Under IAM: Policies: Filter Policies: Check Customer Managed: Click Policy Name: Permissions: Edit Policies: If you see warnings… something isn’t right! It turned out I some old Actions in the IAM! You can fix the policy JSON if you specifically know the correctly update; or you can use the console. Note: I’ve noticed you can’t always remove bad policy information from the console, so you must remove it from the JSON.

[edit]