tf-nealalan.com
nealalan.github.io/tf-nealalan.com
Project Goal
- Automate the creation AWS Infrastructure and an NGINX webserver running on Ubuntu. (Certbot steps might need to be manually run.)
- Stay security minded by restricting network access and creating a secure web server.
- Verify secure sites: Sophos Security Headers Scanner and SSL Labs test .
Project Status
- Updated to Terraform v0.12 in August 2019
- Reapplied to convert from T2.micro to T2.nano
Prereqs
- See https://nealalan.github.io/EC2_Ubuntu_LEMP/ project and go through the steps up until VPC, they include:
- Review terminology and scope
- About the AWS free tier
- Identity & Access Management (IAM)
- Registering your domain name and creating a Hosted Zone in Route 53
- VPC CIDR Address and Public Subnet
- EC2: Network & Security: Key Pairs
- The first step in Connect to your instance - except here you can connect to ubuntu@domain.com or ubuntu@EIP
- An AWS account with the IAM keys created for use in terraform
- Install terraform or search your package manager
- Configure terraform with IAM keys
- Optional:
- Atom installed
- Github installed
Files
This repo contains two types of files:
- .tf - terraform files (infrastructure as code) to create a VPC, associated components and an EC2 Ubuntu instance in a Public Subnet (best practice is to separate out the terraform components into sections)
- install.sh - shell script to configure the Ubuntu instance to configure NGINX web server with secure websites (https) - The website are automatically pulled from git repos for respective sites.
- ~/.aws/neals_web_server.pub - need the public key installed on the server to ssh in
Steps / Commands
Locally:
$ git clone this repo
$ terraform init
$ terraform plan
$ terraform apply
$ ssh -i priv_key.pem ubuntu@ip
Connected to instance: I’ve noticed this is best done manually versus passing into as user params. If something fails or a dialogue pops up, you want to be able to respond!
$ curl https://raw.githubusercontent.com/nealalan/tf-nealalan.com/master/install.sh > install.sh
$ chmod +x ./install.sh
$ ./install.sh
# *** MANUALLY RUN CERTBOT IF NECESSARY ***
$ sudo certbot --installer nginx -d nealalan.com,*.nealalan.com,neonaluminum.com,*.neonaluminum.com,*.fire.neonaluminum.com --email nad80@yahoo.com --agree-tos --eff-email --redirect --manual
# sudo nginx -s reload
Optional, to destroy the infrastructure:
$ terraform plan -destroy
$ terraform destroy
Result
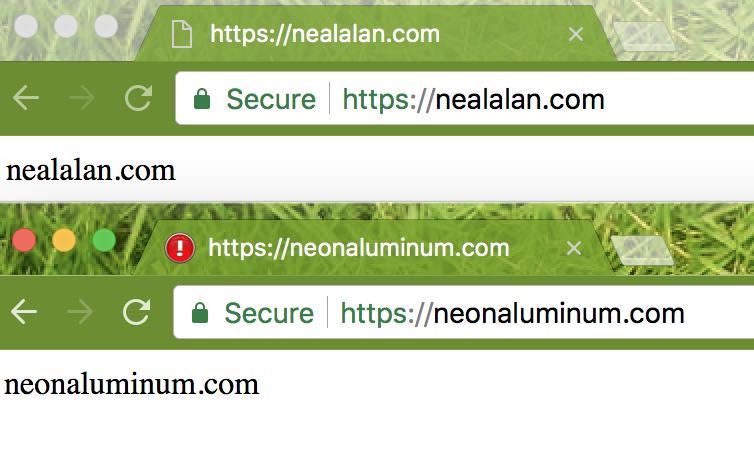
My server is at static IP 18.223.13.99 serving https://nealalan.com and https://neonaluminum.com with redirects from all http:// addresses
NEXT STEPS & OTHER NOTES ON PROBLEMS
pm2 python app errors
I ran into an issue with using python3. To see what the error is in PM2, I can use $ pm2 log 1 for process 1.
To resolve, installed the appropriate library:
sudo apt install python3-pip
pip3 install flask
Precreated SGs
One issue I ran into is I created my own SG that I continually wanted to use. Once the EC2 instance is created, I go to Console > EC2 > Actions > Networking > SGs to add mine.
Killing and recreating instances
If I kill an instance and only want to recreate a new version of it with no changes, terraform will not do this smoothly. I need to manually go to Console > EC2 > Actions > Networking > Manually Disassociation Elastic IP Address. This forces a change to the EC2 instance that terraform knows it can only fix by creating a new instance.
CERTBOT ISSUES
This looks promising, but requires a script to give the EC2 instance access to the Route 53 DNS records to create a TXT record for verification. https://certbot-dns-route53.readthedocs.io/en/stable/ In the meantime, I will just use the manual method.
sudo certbot --installer nginx -d nealalan.com,*.nealalan.com,neonaluminum.com,*.neonaluminum.com,*.fire.neonaluminum.com --pre-hook 'sudo service nginx stop' --post-hook 'sudo service nginx start' --email nad80@yahoo.com --agree-tos --eff-email --redirect --manual
- –manual = allows for a TXT DNS record to be created (this is because of using wildcard domains I think)
- –redirect = Automatically redirect all HTTP traffic to HTTPS for the newly authenticated vhost
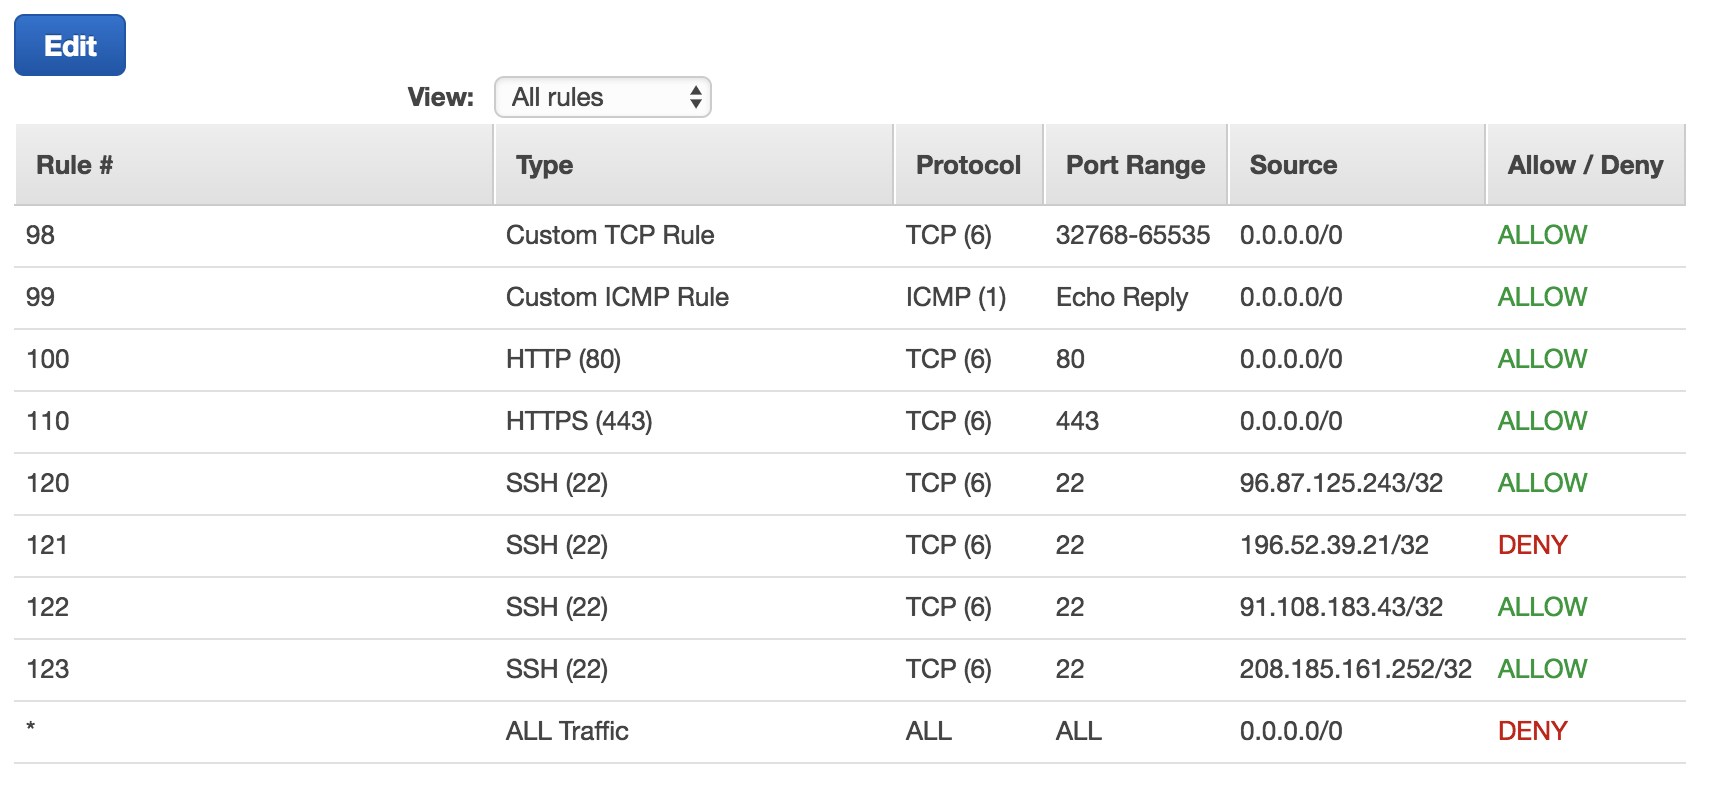
ACLs
As you move around you’llneed to log in to the AWS Console and add your local IP address to the EC2: Network ACLs. Here’s an example of one I had in the past…
 Also, I now have the flexibility to totally recreate the websever through a few small script changes if I make major site changes, add a new domain name or need to upgrade to the latest LTS of Ubuntu.
Installing MariaDQ
And setting it to have a Root PW…
$ sudo apt install mariadb-client
$ sudo apt install mariadb-server
$ sudo passwd root
$ sudo mysql -u root
# Disable plugin authentication for root
> use mysql;
> update user set plugin='' where User='root';
> flush privileges;
> exit
$ sudo systemctl restart mariadb.service
$ sudo mysql_secure_installation
# verity root auth works
$ sudo mysql -u root
$ sudo mysql -u root -p
Fixing Errors in Terraform
Within a few days I messed up my Ubuntu instance. The solution was clearly going to take longer than 15 minutes. So here’s what I did, thanks to terraform:
-
Grab what is managed by terraform

- Mark the Ubuntu instance as tainted for destruction
terraform taint aws_instance.wb - Verify what will happen (a side effect was my ACLs and SGs will be cleaned up since I was running an outdated lab that requried me to open some ports)
$ terraform plan
- Run!
$ terraform apply - Setup Ubuntu to host my webserver again
$ curl https://raw.githubusercontent.com/nealalan/tf-nealalan.com/master/install.sh > install.sh $ chmod +x ./install.sh $ .install.sh - Consider using virtuanenv or even running another EC2 instance when I want to plan with some labs?!?!?!
[edit]